Scanning Big Networks - Basics
An overview of optimizing methods for network, host and port identification with nmap tool.
Introduction
Hi! Today I want to share my notes on scanning networks to identify potential vulnerable targets in case of big networks. We will review the methods of getting the right results and the ways to optimize these methods.
While I was working on a network pentest project, I’ve got into a client’s network and was tasked to identify as much network services vulnerabilities as possible. It was a flat network with more than 10.000 hosts available (identified just by pinging them!). The limitation here is a time for the project to do the job and submit the report.
I was in a situation when the time of the project was so much limited and I couldn’t perform all ports and services scanning. So it was crucial to do some optimization and prioritizing.
Overview of Internal Networks in Enterprise
An enterprise network is a large-scale, complex infrastructure that connects various devices, systems, and applications within an organization. Its primary goal is to ensure seamless communication, data sharing, and resource management across different departments and locations. These networks are designed to support business-critical operations, maintain high availability, and enforce robust security measures.
Types of Enterprise Networks
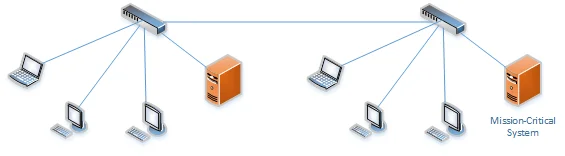
Flat Network
A flat network is a simple architecture where all devices are connected within a single domain without any segmentation. This design minimizes the complexity of network management but introduces significant security risks, as threats can easily propagate across the entire network. Flat networks are easier to scan but can be overwhelming due to the high volume of devices and lack of logical boundaries.
Segmented Network
In a segmented network, the infrastructure is divided into multiple subnets or VLANs based on functional, departmental, or security requirements. Segmentation reduces the attack surface, improves performance by limiting broadcast traffic, and simplifies management. Network scanning in segmented environments requires awareness of the segmentation structure to efficiently cover all areas without redundant efforts.
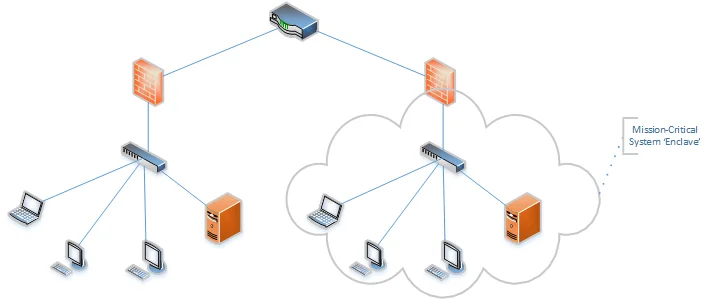
Segmented and Monitored Network
This advanced network architecture not only segments the infrastructure but also incorporates continuous monitoring and security controls, such as firewalls, IDS/IPS, and network access controls. While segmentation enhances security, monitoring adds another layer of defense by detecting and responding to suspicious activities in real-time. Scanning in such networks can trigger security alerts, requiring careful planning to avoid disruptions and ensure comprehensive coverage.
Performing network scans in enterprise environments can be extremely time-consuming due to the vast number of devices, complex topologies, and stringent security measures. Therefore, it is essential to implement filtering and optimization techniques to streamline the scanning process.
Configure nmap
The examples in this entire post will use the nmap tool to perform network scanning. You can accomplish the same results with other tools like masscan, rustscan, etc… But I will cover the nmap only here, because of its popularity and stability.
In our examples we will use a lot of nmap options to optimize the scanning. The list of the most common ones is specified below. These ones will be used almost everywhere.
-n: disables DNS host resolution;-Pn: disables ping scanning entirely;-p: specifies ports to scan;--min-hostgroup: sets a parallel host group size;--min-rate: sets a minimum of requests per second;--max-retries: set a maximum of retries to scan ports with no response;--min-parallelism: sets a minimum for probe parallelization;--script: specifies a list of scripts to execute after the scan;-oA: tells nmap to output the results in all available formats (text, greppable, XML);
I will mention more specific options separately in sections below.
Identify Networks
The first task for us is to identify available networks. We want this to reduce number of blind network requests, like ping to host or no-ping port scanning.
Find routers
This can be accomplished with find-the-router method (I just came up with that name). The idea here is to ping or scan several ports only on only one host in subnet. That host must have a pattern for its IP-address, like 10.10.10.1 and 10.10.11.1, where .1 is used for routers, for example.
The common pattern for the most networks is to setup default infrastructure like switches and routers in default way, like setup a .1 IP-address in our example. We can identify that pattern and use it to identify working networks in our case.
For example, we can find .1 hosts in entire 10.0.0.0/8 network by just pinging several hosts in command below:
1
2
3
# -sn to disable port scanning
# -PE to enable ping scanning
sudo nmap -sn -n 10.0-255.0-255.1 -PE --min-hostgroup 10000 --min-rate 10000 -oA pattern-ping
If the ping scan is not available, but you know that routers in the network are configured with the same pattern, you can try to scan common remote control ports like 22,23,2222 on hosts with .pattern IP-addresses.
1
nmap -Pn -n --min-hostgroup 256 --min-rate 1280 -p 22,23,2222 -oA pattern-commonports 10.0-255.0-255.1
Identify Hosts
Multicast in local network
Hosts are frequently announcing themselves with multicast traffic in their local network. For example they can do ARP requests to get the right IP-address, or announce hostnames or installed products with MDNS queries, like with Googlecast in Chrome browser. We can use that to identify neighbor hosts in our network.
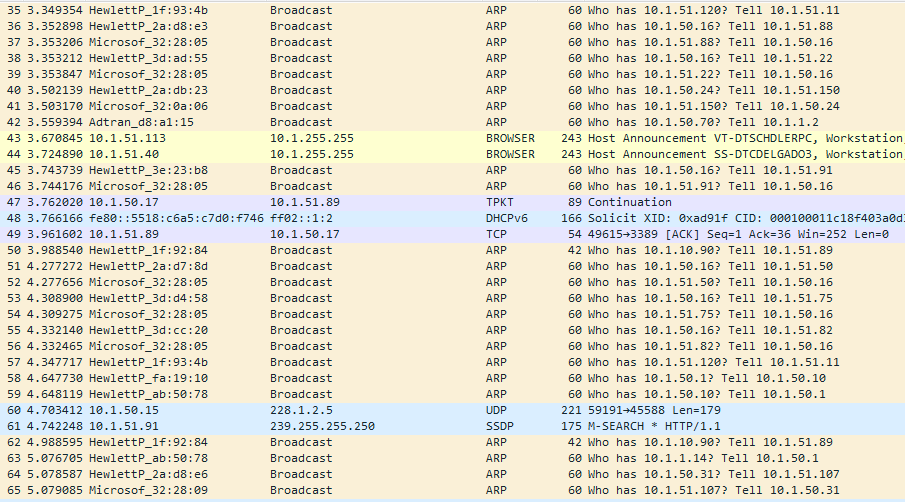
Also, in case of Windows clients network, it is possible to search for enabled LLMNR/NETBIOS spoofing attack vectors if you see those queries in the multicast traffic.
Ping
The most common way to identify hosts is to use the ICMP protocol, which was designed to check the availability of the network resources. If the hosts are configured to response on ICMP-requests, we can use tools like native ping to discover hosts.
The ping tool is available on both Windows and Linux and can be used with scripting to process the list of networks. For example, the Linux version with Bash scripting can look like below:
1
for host in $(cat hosts.txt); do ping -c 1 $host | grep 'bytes from' | cut -d " " -f4 | tr -d ":" >> ping_ips.txt; done
The same could be achieved in Windows CMD:
1
for /L %i in (0, 1, 256) do ping -n 1 172.16.2.%i | FIND "TTL=" >> ping_ips.txt
Also a specific tools could be leveraged to ping hosts. The examples below use fping and nmap tools to perform ping scanning.
1
2
# -g to generate a target list from our input
fping -g 10.10.110.0/24 2>&1 | grep -v 'unreachable' > ping_alives
1
sudo nmap -sn -PE -iL scope.txt -oA pings
Common ports
This type of scan can be useful when a ping scan returns nothing, such as if the administrator has configured all systems to ignore ICMP echo requests.
The most common opened ports for internal systems are remote control and web interfaces. We can use that to generate a small list of ports to scan, like 22,2222 for SSH, 80,443 for web interfaces and 3389 for RDP. We can increase or decrease target ports according to our specific needs.
1
nmap -Pn -n --min-hostgroup 256 --min-rate 1280 -p 22,80,443,3389,2222 -iL scope.txt -oA commonports
After the scan is done, we can just grep the nmap output for open keyword. The command below will display the host if there is at least one opened port on it.
1
cat commonports.gnmap | grep open | cut -d " " -f2
DNS server
We can find targets DNS server and leverage it to resolve the hosts and subdomains. This information could be used to identify the purpose of the host without interacting with it directly.
At first we want to check the DNS server if it is configured to support DNS zone transfer, axfr requests. If it does, we could get a full list of subdomains for given domain in just one interaction. We can check and leverage this with dig command.
1
dig axfr domain.local @10.10.10.10
Also, we have to find the targets domain to resolve its subdomains.
If the zone transfer query is not available to us, we can use subdomain bruteforce technique to identify subdomains of the targets domain with wordlist. For that task we can use aiodnsbrute tool. It is designed to scan the Internet, but can be leveraged in local networks by specifying the local resolver.
1
echo 10.10.10.10 | aiodnsbrute -r - domain.local
Another way to leverage the DNS server is to do the Reverse-IP queries. DNS servers provides an ability to get the domain name for the given IP-address in the query. We can use that to identify available hosts by getting their domain names.
We can perform the Reverse-IP resolve technique with hakrevdns tool. The most basic usage is to simply pipe a list of IP addresses into the tool, for example:
1
cat ips.txt | hakrevdns -r 1.1.1.1
Identify Ports
Once we have a lists of targets, we want to start identifying available services on that targets. Our optimization here can be done with filtering less common ports entirely, paralleling the probes, decreasing network timeout time and increasing the minimum rate of probing within a second.
We will review UDP port scanning in the next section.
One port
Less frequent example is to scan the network for only one opened port. For example, we may want to quickly identify all hosts with port 445 open to perform a password spraying for local administrator credentials. We can do that with command below:
1
sudo nmap --open -sS -Pn -n --min-hostgroup 4096 --max-retries 2 --max-rtt-timeout 500ms --min-rate 1000 --min-parallelism 128 -iL scope.txt -p 445 -oA scope_445_open
Common ports
More frequent example is to find common opened ports. These includes common ports for web applications, databases, backup systems, etc…
In the example below we specify rate, parallelism, host group and a set of ports to quickly scan some common occurring ports. The list of ports can be changed depending on your experience.
1
sudo nmap -v -sS -n -Pn --open --max-retries 2 --min-rate=200 --min-parallelism=128 --min-hostgroup 256 -p 2375,623,27017,27018,27019,28017,44818,6379,4786,3050,2049,5800,5900,1521,1433,5432,6000,3306,3389,8080,8081,8443,8180,1311,80,88,111,113,264,443,445,139,389,512,513,514,548,593,554,8554,873,1099,3128,3260,3299,5555,5984,8009,9100,9160,11211,135,513,21,22,23,79,10000,9000,110,25,143,16379,26379,1540,1541,1560,2222,2022,1022,8000,8001,8090,9443,8888,8800,4848,8181,8008,7000,7001,8880,2121,8400,6129,992,5433,9200,9300,4321,2376,10255,5000,8983,8088,8383,4990,8500,6066,2301,2381,5060 -iL <hosts> -oA <filename>
Top ports
Other way to identify opened ports is to use the list of top identified ports provided by the nmap or other tool.
While more than a hundred thousand (total) TCP and UDP ports exist, the vast majority of open ports fall within a much smaller set. According to nmap developers research, the top 10 TCP ports and top 1,075 UDP ports represent half of the open ports for their protocol. To catch 90% of the open ports, you need to scan 576 TCP ports and 11,307 UDP ports. You can view a more detailed statistic at nmap’s Port Selection Data and Strategies documentation.
In the example below we specify a list of 100 top TCP ports:
1
sudo nmap -v -sS -n -Pn --open --max-retries 2 --min-rate=200 --min-parallelism=128 --min-hostgroup 256 --top-ports 100 -iL hosts.txt -oA top100
The number of top ports can be changed. You can view the lists of top N ports for nmap in top-nmap-ports-csv repository.
All ports
The most time-consuming method is to scan all available ports on target systems. But this method will give the most comprehensive results, like opened services on non-default ports.
It can be useful in doing labs like HackTheBox or when the target host is interesting for full enumeration and every port is valuable for us.
We can optimize this type of scanning by reducing the number of retries and probe timeout, and specify the rate per second for our scan. The goal here is to make the whole scan be done in 1 step, enabling parallelism in the whole scan.
Examples of scanning all ports is provided in commands below:
1
2
3
4
5
# all ports for one host
sudo nmap -g 53 -v -sS -n -Pn --open --max-retries 0 --min-rate=1000 --min-parallelism=256 --min-hostgroup 256 -p- 10.10.10.10

# all ports for identified hosts
sudo nmap -g 53 -v -sS -n -Pn --open --max-retries 0 --min-rate=1000 --min-parallelism=256 --min-hostgroup 256 -p- -iL <hosts> -oA <filename>
Identify Services
At this time of our work we have a list of targets and opened TCP ports. Now we may want to identify what services are provided behind these ports. We will review some identification methods and optimization options below. These can be combined with scanning optimization options.
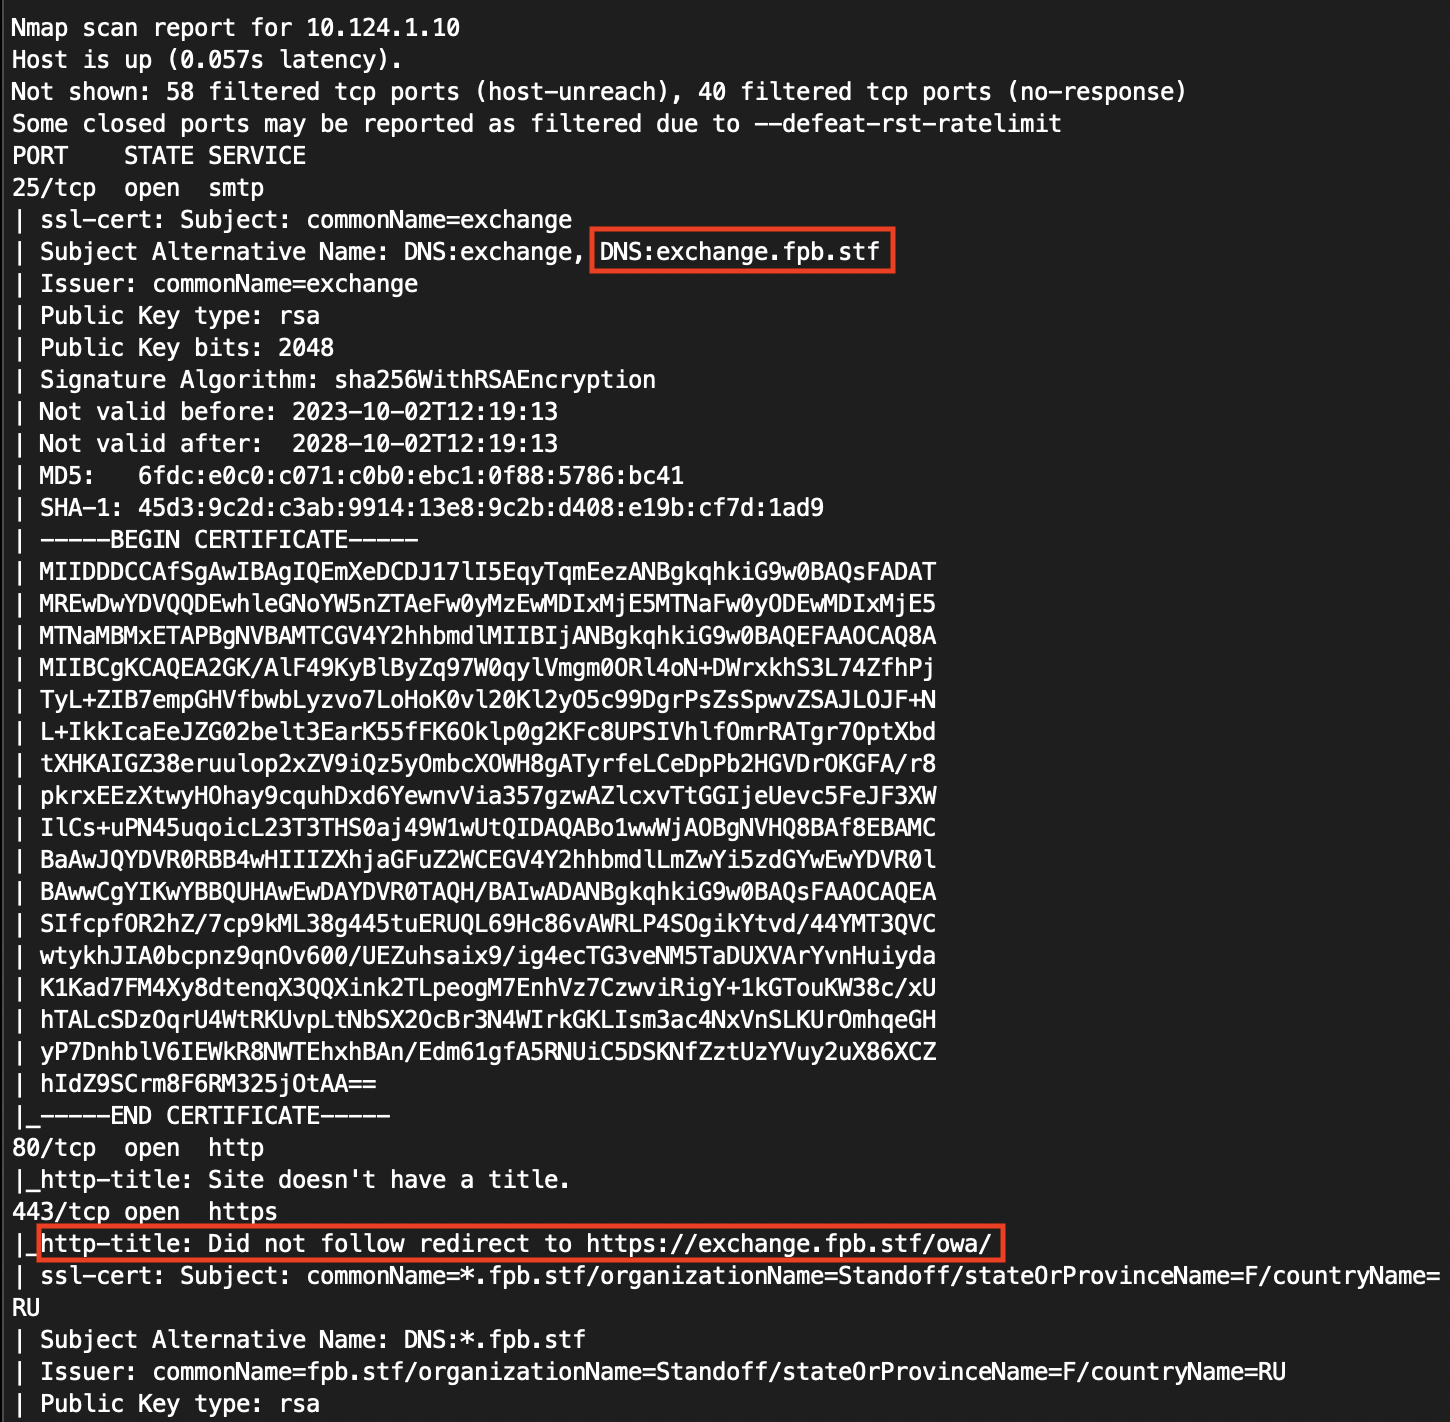
http-title and ssl-cert
Since the most of the available services in the network is web applications, we can use that to do our scanning more efficiently by just grabbing the certificate and sending base HTTP requests to get the title of the page.
With that technique we will clearly identify web applications and some network services that are using encrypted channels. Often the certificates for that services include the domain name for the host and the service, like xmpp.domain.local.
Also we can assume that opened ports that do not respond to HTTP requests and do not contain the certificate are used for well-known services on well-known ports. This method will increase our speed to identify targets.
For example, this is done with nmap with default scripts:
1
nmap --script http-title,ssl-cert -iL ips.txt -oA results
This method will identify services like SMTPS and IMAPS as well because the same logic of using SSL certificates.
Bruteforce services
The most common way of identifying services is to bruteforce request probes and view the answers on each request. If the signature of response matches the signature type of the request, then the service is identified. For example, getting HTTP/1.1 200 OK response on GET / HTTP/1.1 request is the signature match for HTTP server. The server can give more values to process the signature, like the server version.
Nmap has a version detection option -sV. Alternatively, you can use A, which enables version detection among other things.
Nmap is using its nmap-services database of about 2,200 well-known services. Nmap would report that opened ports probably correspond to a mail server (SMTP), web server (HTTP), or name server (DNS), for example.
By default, Nmap version detection skips several ports number from version detection because probing some ports can result in bad things happen, like port 9100 on printers. We can turn off this behavior with --allports option.
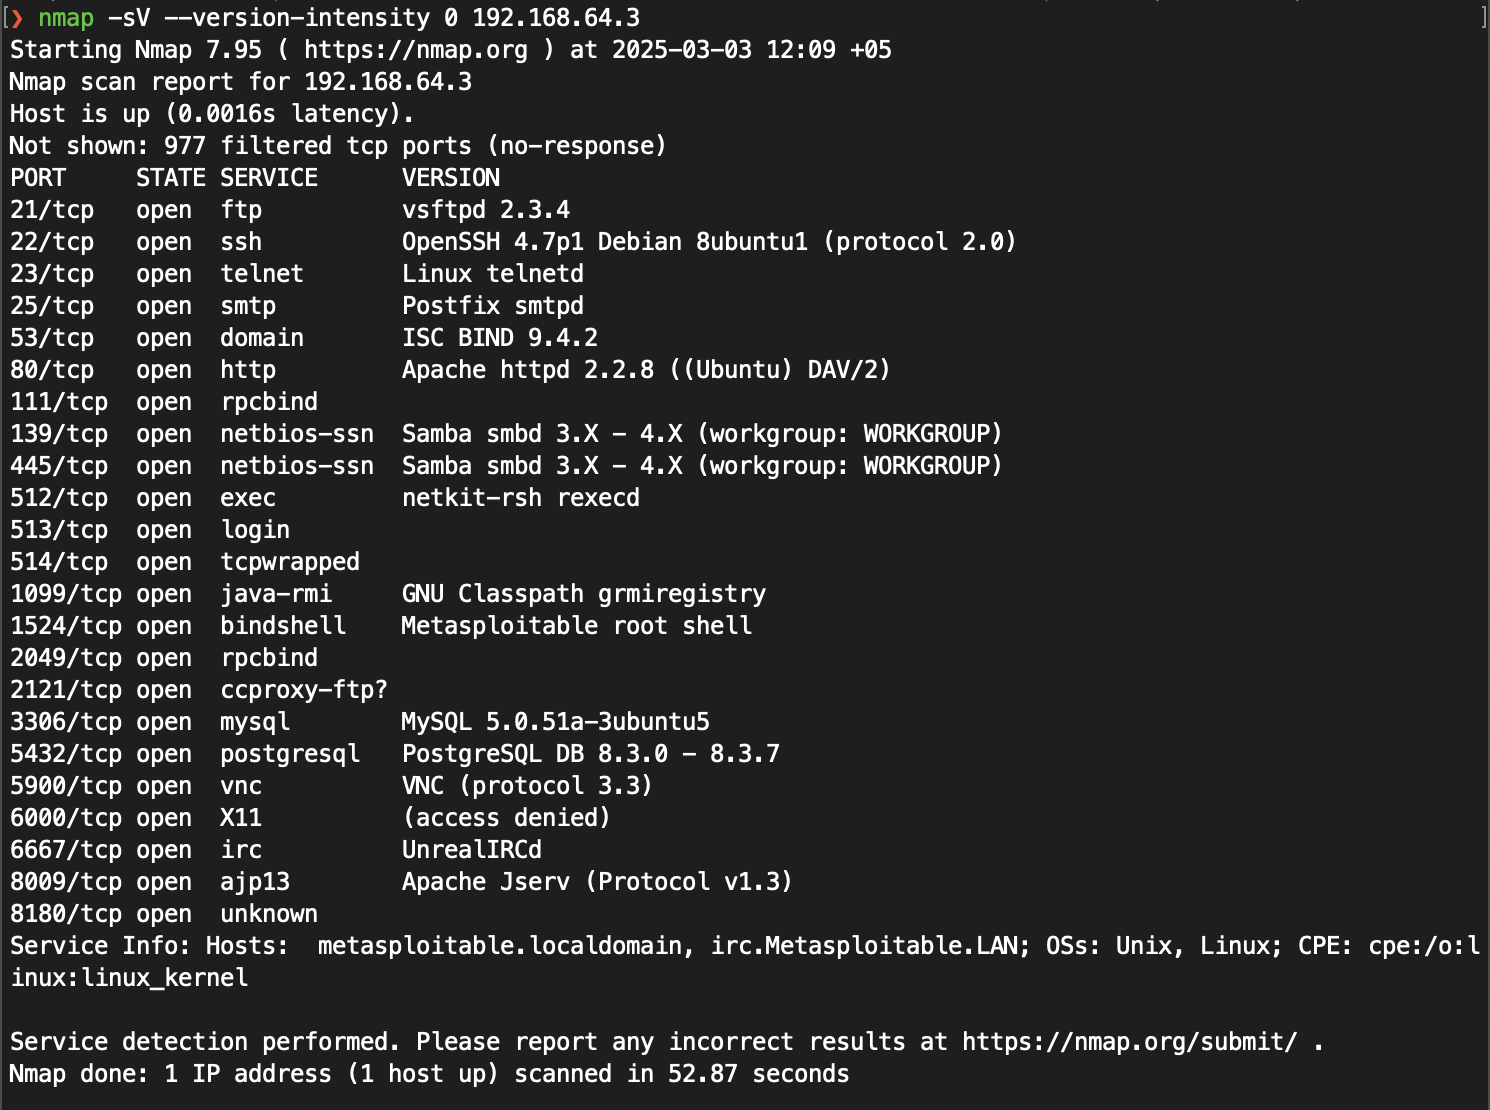
When performing a version scan, Nmap sends a series of probes, each of which is assigned a rarity value between one and nine. The lower-numbered probes are effective against a wide variety of common services, while the higher-numbered ones are rarely useful. The default is 7. We can change the level of intensity with --version-intensity *<intensity> option. However, high intensity scans take longer.*
In purpose of our research we can optimize our scanning by setting the level of intensity to 0. This will determine only basic services and miss a lot of things, but will output something in much less time.
1
2
3
nmap -sV 10.10.10.10
nmap -sV --allports 10.10.10.10
nmap -sV --version-intensity 0 10.10.10.10
UDP services
In UDP scanning, it is impossible to determine open UDP ports without sending the exact data to them. You can check for explicitly closed ports if the target host is configured to send ICMP “Destination Unreachable” messages. Otherwise, you can only assume that the port is in OPEN or FILTERED state.
To determine whether the UDP port is open, we have to send the right service signature data, like SNMP request. If the port answers with SNMP response, we can say that the port is open.
That said, we can assume that scanning for all UDP ports is a really bad idea because it is impossible to optimize it. You have to assume that all ports are open if not explicitly closed, and to send signature requests like nmaps service version identification, -sV. In all ports scan that means 65535 opened ports and service bruteforcing tasks, which is too time-consuming.
The solution here is to assume that target services don’t use non-standard UDP ports. We can just specify the top UDP services by ports and scan them only.
1
sudo nmap -v -Pn -n -g 53 -sU --open --min-rate=200 --min-parallelism=128 --min-hostgroup 256 -p 7,9,11,13,17,19,20,37,39,42,49,52-54,65-71,81,111,161,123,136-170,514-518,630,631,636-640,650,653,921,1023-1030,1900,2048-2050,27900,27960,32767-32780,32831 -sV -iL <hosts> -oA <filename>
Resources
- https://nmap.org/book/toc.html
- https://insights.sei.cmu.edu/blog/network-segmentation-concepts-and-practices/
Conclusion
In this post we’ve reviewed methods of scanning networks to identify targets and the ways to optimize this time-consuming process.
In next part of this series we will review some methods to evade defense solutions while performing the scan, automate the process of scanning and visualize the output.
Thank you for reading, I hope it was useful for you ❤️